

Storage
AWS Amplify Storage module provides a simple mechanism for managing user content for your app in public, protected or private storage buckets. The Storage category comes with built-in support for Amazon S3.
Ensure you have installed and configured the Amplify CLI and library.
Automated Setup
Amplify CLI helps you to create and configure the storage buckets for your app. The default implementation of the Storage module leverages Amazon S3.
Create Your Backend with the CLI
To create a project fully functioning with the Storage category, run the following command:
$ amplify add storage
and select Content in prompted options:
? Please select from one of the below mentioned services (Use arrow keys)
❯ Content (Images, audio, video, etc.)
  NoSQL Database
The CLI will walk you though the options to enable Auth, if not enabled previously, and name your S3 bucket. To update your backend run:
$ amplify push
When your backend is successfully updated, your new configuration file aws-exports.js is copied under your source directory, e.g. ‘/src’.
Lambda Triggers
If you want to enable triggers for the storage category with Amazon S3 & Amazon DynamoDB as providers, the CLI supports associating Lambda triggers with S3 and DynamoDB events. For example, this can be useful for a use case where you want to invoke a Lambda function after a create or update operation on a DynamoDB table managed by the Amplify CLI. Read More
Configure Your App
In your app’s entry point i.e. App.js, import and load the configuration file aws-exports.js which has been created and replaced into /src folder in the previous step.
import Amplify, { Storage } from 'aws-amplify';
import awsconfig from './aws-exports';
Amplify.configure(awsconfig);
Manual Setup
Manual setup enables you to use your existing Amazon Cognito and Amazon S3 credentials in your app:
import Amplify from 'aws-amplify';

Amplify.configure({
    Auth: {
        identityPoolId: 'XX-XXXX-X:XXXXXXXX-XXXX-1234-abcd-1234567890ab', //REQUIRED - Amazon Cognito Identity Pool ID
        region: 'XX-XXXX-X', // REQUIRED - Amazon Cognito Region
        userPoolId: 'XX-XXXX-X_abcd1234', //OPTIONAL - Amazon Cognito User Pool ID
        userPoolWebClientId: 'XX-XXXX-X_abcd1234', //OPTIONAL - Amazon Cognito Web Client ID
    },
    Storage: {
        AWSS3: {
            bucket: '', //REQUIRED -  Amazon S3 bucket
            region: 'XX-XXXX-X', //OPTIONAL -  Amazon service region
        }
    }
});
Mocking and Local Testing
Amplify supports running a local mock server for testing your application with S3. Please see the CLI Toolchain documentation for more details.
Using Amazon S3
If you set up your Cognito resources manually, the roles will need to be given permission to access the S3 bucket.
There are two roles created by Cognito: an Auth_Role that grants signed-in-user-level bucket access and an Unauth_Role that allows unauthenticated access to resources. Attach the corresponding policies to each role for proper S3 access. Replace {enter bucket name} with the correct S3 bucket.
Inline policy for the Auth_Role:
{
    "Version": "2012-10-17",
    "Statement": [
        {
            "Action": [
                "s3:GetObject",
                "s3:PutObject",
                "s3:DeleteObject"
            ],
            "Resource": [
                "arn:aws:s3:::{enter bucket name}/public/*",
                "arn:aws:s3:::{enter bucket name}/protected/${cognito-identity.amazonaws.com:sub}/*",
                "arn:aws:s3:::{enter bucket name}/private/${cognito-identity.amazonaws.com:sub}/*"
            ],
            "Effect": "Allow"
        },
        {
            "Action": [
                "s3:PutObject"
            ],
            "Resource": [
                "arn:aws:s3:::{enter bucket name}/uploads/*"
            ],
            "Effect": "Allow"
        },
        {
            "Action": [
                "s3:GetObject"
            ],
            "Resource": [
                "arn:aws:s3:::{enter bucket name}/protected/*"
            ],
            "Effect": "Allow"
        },
        {
            "Condition": {
                "StringLike": {
                    "s3:prefix": [
                        "public/",
                        "public/*",
                        "protected/",
                        "protected/*",
                        "private/${cognito-identity.amazonaws.com:sub}/",
                        "private/${cognito-identity.amazonaws.com:sub}/*"
                    ]
                }
            },
            "Action": [
                "s3:ListBucket"
            ],
            "Resource": [
                "arn:aws:s3:::{enter bucket name}"
            ],
            "Effect": "Allow"
        }
    ]
}
Inline policy for the Unauth_Role:
{
    "Version": "2012-10-17",
    "Statement": [
        {
            "Action": [
                "s3:GetObject",
                "s3:PutObject",
                "s3:DeleteObject"
            ],
            "Resource": [
                "arn:aws:s3:::{enter bucket name}/public/*"
            ],
            "Effect": "Allow"
        },
        {
            "Action": [
                "s3:PutObject"
            ],
            "Resource": [
                "arn:aws:s3:::{enter bucket name}/uploads/*"
            ],
            "Effect": "Allow"
        },
        {
            "Action": [
                "s3:GetObject"
            ],
            "Resource": [
                "arn:aws:s3:::{enter bucket name}/protected/*"
            ],
            "Effect": "Allow"
        },
        {
            "Condition": {
                "StringLike": {
                    "s3:prefix": [
                        "public/",
                        "public/*",
                        "protected/",
                        "protected/*"
                    ]
                }
            },
            "Action": [
                "s3:ListBucket"
            ],
            "Resource": [
                "arn:aws:s3:::{enter bucket name}"
            ],
            "Effect": "Allow"
        }
    ]
}
The policy template that Amplify CLI uses is found here.
Amazon S3 Bucket CORS Policy Setup
To make calls to your S3 bucket from your App, you need to set up a CORS Policy for your S3 bucket. This callout is only for manual configuration of your S3 bucket, CORS Policy configuration is done automatically via Amplify CLI when running amplify add storage.
The following steps will set up your CORS Policy:
- Go to Amazon S3 Console and click on your project’s
userfilesbucket, which is normally named as [Project Name]-userfiles-mobilehub-[App Id]. - Click on the Permissions tab for your bucket, and then click on the CORS configuration tile.
- Update your bucket’s CORS Policy to look like:
<?xml version="1.0" encoding="UTF-8"?>
<CORSConfiguration xmlns="http://s3.amazonaws.com/doc/2006-03-01/">
<CORSRule>
    <AllowedOrigin>*</AllowedOrigin>
    <AllowedMethod>HEAD</AllowedMethod>
    <AllowedMethod>GET</AllowedMethod>
    <AllowedMethod>PUT</AllowedMethod>
    <AllowedMethod>POST</AllowedMethod>
    <AllowedMethod>DELETE</AllowedMethod>
    <MaxAgeSeconds>3000</MaxAgeSeconds>
    <ExposeHeader>x-amz-server-side-encryption</ExposeHeader>
    <ExposeHeader>x-amz-request-id</ExposeHeader>
    <ExposeHeader>x-amz-id-2</ExposeHeader>
    <ExposeHeader>ETag</ExposeHeader>
    <AllowedHeader>*</AllowedHeader>
</CORSRule>
</CORSConfiguration>
Note: You can restrict the access to your bucket by updating AllowedOrigin to include individual domains.
File Access Levels
Storage module can manage files with three different access levels; public, protected and private. The Amplify CLI configures three different access levels on the storage bucket: public, protected and private. When you run amplify add storage, the CLI will configure appropriate IAM policies on the bucket using a Cognito Identity Pool Role. You will have the option of adding CRUD (Create/Update, Read and Delete) based permissions as well, so that Authenticated and Guest users will be granted limited permissions within these levels.
If you had previously enabled user sign-in by running amplify add auth in your project, the policies will be connected to an Authenticated Role of the Identity Pool which has scoped permission to the objects in the bucket for each user identity. If you haven’t configured user sign-in, then an Unauthenticated Role will be assigned for each unique user/device combination, which still has scoped permissions to just their objects.
- Public: Accessible by all users of your app. Files are stored under the
public/path in your S3 bucket. - Protected: Readable by all users, but writable only by the creating user. Files are stored under
protected/{user_identity_id}/where theuser_identity_idcorresponds to the unique Amazon Cognito Identity ID for that user. - Private: Only accessible for the individual user. Files are stored under
private/{user_identity_id}/where theuser_identity_idcorresponds to the unique Amazon Cognito Identity ID for that user.
When using Auth and Storage modules together, you do not need to construct the /{user_identity_id}/ manually as the library will use the configured Cognito Identity ID for your user/device along with the configured access level for an action. This includes UnAuthenticated access where you will first call Auth.currentCredentials() before a Storage action. See Authentication for more information.
The access level can be configured on the Storage object globally. Alternatively, the access levels can be set in individual function calls.
Default access level for Storage module is public. Unless you configure Storage otherwise, all uploaded files will be publicly available for all users.
Access level configuration on the Storage object:
Storage.configure({ level: 'private' });

Storage.get('welcome.png'); // Gets the welcome.png belonging to current user
Configuration when calling the API:
Storage.get('welcome.png', { level: 'public' }); // Gets welcome.png in public space
The default access level is public:
Storage.get('welcome.png'); // Get welcome.png in public space
There is also a shortcut vault, which is merely a Storage instance with private level set:
Storage.vault.get('welcome.png'); // Get the welcome.png belonging to current user
Working with the API
Import Storage from the aws-amplify library:
import { Auth, Storage } from 'aws-amplify';
If you use aws-exports.js file, Storage is already configured when you call Amplify.configure(awsconfig). To configure Storage manually, you will have to configure Amplify Auth category too.
Auth.configure(
    // To get the aws credentials, you need to configure
    // the Auth module with your Cognito Federated Identity Pool
    identityPoolId: 'XX-XXXX-X:XXXXXXXX-XXXX-1234-abcd-1234567890ab',
    region: 'XX-XXXX-X',
);

Storage.configure({
    AWSS3: {
        bucket: '',//Your bucket name;
        region: ''//Specify the region your bucket was created in;
    }
});
Put
Puts data into Amazon S3.
It returns a {key: S3 Object key} object on success:
Storage.put('test.txt', 'Hello')
    .then (result => console.log(result)) // {key: "test.txt"}
    .catch(err => console.log(err));
Public level:
Storage.put('test.txt', 'Hello')
    .then (result => console.log(result))
    .catch(err => console.log(err));
Protected level:
Storage.put('test.txt', 'Protected Content', {
    level: 'protected',
    contentType: 'text/plain'
})
.then (result => console.log(result))
.catch(err => console.log(err));
Private level:
Storage.put('test.txt', 'Private Content', {
    level: 'private',
    contentType: 'text/plain'
})
.then (result => console.log(result))
.catch(err => console.log(err));
To track the progress of your upload, you can use the progressCallback:
Storage.put('test.txt', 'File content', {
    progressCallback(progress) {
        console.log(`Uploaded: ${progress.loaded}/${progress.total}`);
  },
});
To utilize Server-Side Encryption with AWS KMS, the following options can be passed in with the Put API like so:
const serverSideEncryption = AES256 | aws:kms;
const SSECustomerAlgorithm = 'string';
const SSECustomerKey = new Buffer('...') || 'string';
const SSECustomerKeyMD5 = 'string';
const SSEKMSKeyId = 'string';
Storage.put('test.txt', 'File content', {
    serverSideEncryption, SSECustomerAlgorithm, SSECustomerKey, SSECustomerKeyMD5, SSEKMSKeyId
})
.then (result => console.log(result))
.catch (err => console.log(err));
Other options available are:
Storage.put('test.txt', 'My Content', {
    cacheControl: '', // (String) Specifies caching behavior along the request/reply chain
    contentDisposition: '', // (String) Specifies presentational information for the object
    expires: new Date().now() + 60 * 60 * 24 * 7, // (Date) The date and time at which the object is no longer cacheable. ISO-8601 string, or a UNIX timestamp in seconds
    metadata: { key: 'value' }, // (map<String>) A map of metadata to store with the object in S3.
})
.then (result => console.log(result))
.catch(err => console.log(err));
Upload an image in the browser:
class S3ImageUpload extends React.Component {
  onChange(e) {
      const file = e.target.files[0];
      Storage.put('example.png', file, {
          contentType: 'image/png'
      })
      .then (result => console.log(result))
      .catch(err => console.log(err));
  }

  render() {
      return (
          <input
              type="file" accept='image/png'
              onChange={(e) => this.onChange(e)}
          />
      )
  }
}
Upload an image in React Native app:
uploadToStorage = async pathToImageFile => {
  try {
    const response = await fetch(pathToImageFile)

    const blob = await response.blob()

    Storage.put('yourKeyHere.jpeg', blob, {
      contentType: 'image/jpeg',
    })
  } catch (err) {
    console.log(err)
  }
}
When a networking error happens during the upload, Storage module retries upload for a maximum of 4 attempts. If the upload fails after all retries, you will get an error.
Get
Retrieves a publicly accessible URL for data stored.
Public level:
Storage.get('test.txt')
    .then(result => console.log(result))
    .catch(err => console.log(err));
Protected level: To get current user’s objects
Storage.get('test.txt', { level: 'protected' })
    .then(result => console.log(result))
    .catch(err => console.log(err));
To get other users’ objects
Storage.get('test.txt', {
    level: 'protected',
    identityId: 'xxxxxxx' // the identityId of that user
})
.then(result => console.log(result))
.catch(err => console.log(err));
Private level:
Storage.get('test.txt', {level: 'private'})
    .then(result => console.log(result))
    .catch(err => console.log(err));
You can use expires option to limit the availability of your URLs. This configuration returns the pre-signed URL that expires in 60 seconds:
Storage.get('test.txt', {expires: 60})
    .then(result => console.log(result))
    .catch(err => console.log(err));
Remove
Delete stored data from the storage bucket.
Public level:
Storage.remove('test.txt')
    .then(result => console.log(result))
    .catch(err => console.log(err));
Protected level:
Storage.remove('test.txt', {level: 'protected'})
    .then(result => console.log(result))
    .catch(err => console.log(err));
Private level:
Storage.remove('test.txt', {level: 'private'})
    .then(result => console.log(result))
    .catch(err => console.log(err));
List keys
List keys under path specified.
Public level:
Storage.list('photos/')
    .then(result => console.log(result))
    .catch(err => console.log(err));
Protected level: To list current user’s objects
Storage.list('photos/', { level: 'protected' })
    .then(result => console.log(result))
    .catch(err => console.log(err));
To get other users’ objects
Storage.list('photos/', {
    level: 'protected',
    identityId: 'xxxxxxx' // the identityId of that user
})
.then(result => console.log(result))
.catch(err => console.log(err));
Private level:
Storage.list('photos/', {level: 'private'})
    .then(result => console.log(result))
    .catch(err => console.log(err));
API Reference
For the complete API documentation for Storage module, visit our API Reference
Using a Custom Plugin
You can create your custom pluggable for Storage. This may be helpful if you want to integrate your app with a custom storage backend.
To create a plugin implement the StorageProvider interface:
import { Storage, StorageProvider } from 'aws-amplify';

export default class MyStorageProvider implements StorageProvider {
    // category and provider name
    static category = 'Storage';
    static providerName = 'MyStorage';

    // you need to implement these seven methods
    // configure your provider
    configure(config: object): object;

    // get object/pre-signed url from storage
    get(key: string, options?): Promise<String|Object>

    // upload storage object
    put(key: string, object, options?): Promise<Object>

    // remove object
    remove(key: string, options?): Promise<any>

    // list objects for the path
    list(path, options?): Promise<any>

    // return 'Storage';
    getCategory(): string;

    // return the name of you provider
    getProviderName(): string;
You can now register your pluggable:
// add the plugin
Storage.addPluggable(new MyStorageProvider());

// get the plugin
Storage.getPluggable(MyStorageProvider.providerName);

// remove the plulgin
Storage.removePluggable(MyStorageProvider.providerName);

// send configuration into Amplify
Storage.configure({
    [MyStorageProvider.providerName]: {
        // My Storage provider configuration
    }
});
The default provider (Amazon S3) is in use when you call Storage.put( ) unless you specify a different provider: Storage.put(key, object, {provider: 'MyStorageProvider'}).
Tracking Events
You can enable automatic tracking of storage events such as uploads and downloads, by setting { track: true } when calling the Storage API.
(Note: this option is currently only supported in aws-amplify). Enabling this will automatically send Storage events to Amazon Pinpoint and you will be able to see them within the AWS Pinpoint console under Custom Events. The event name will be ‘Storage’ and in Event Attributes, you can see details about the event, e.g. Storage > Method > Put.
Track all the Storage events:
Storage.configure({ track: true })
Track a specific storage action:
Storage.get('welcome.png', { track: true });
You can also use the track property directly on React components.
UI Components for React
aws-amplify-react package provides React UI components for common use cases such as picking a file and image previews.
Picker
Picker is used to pick a file from local device storage. PhotoPicker and TextPicker components are specific to image and text file types .
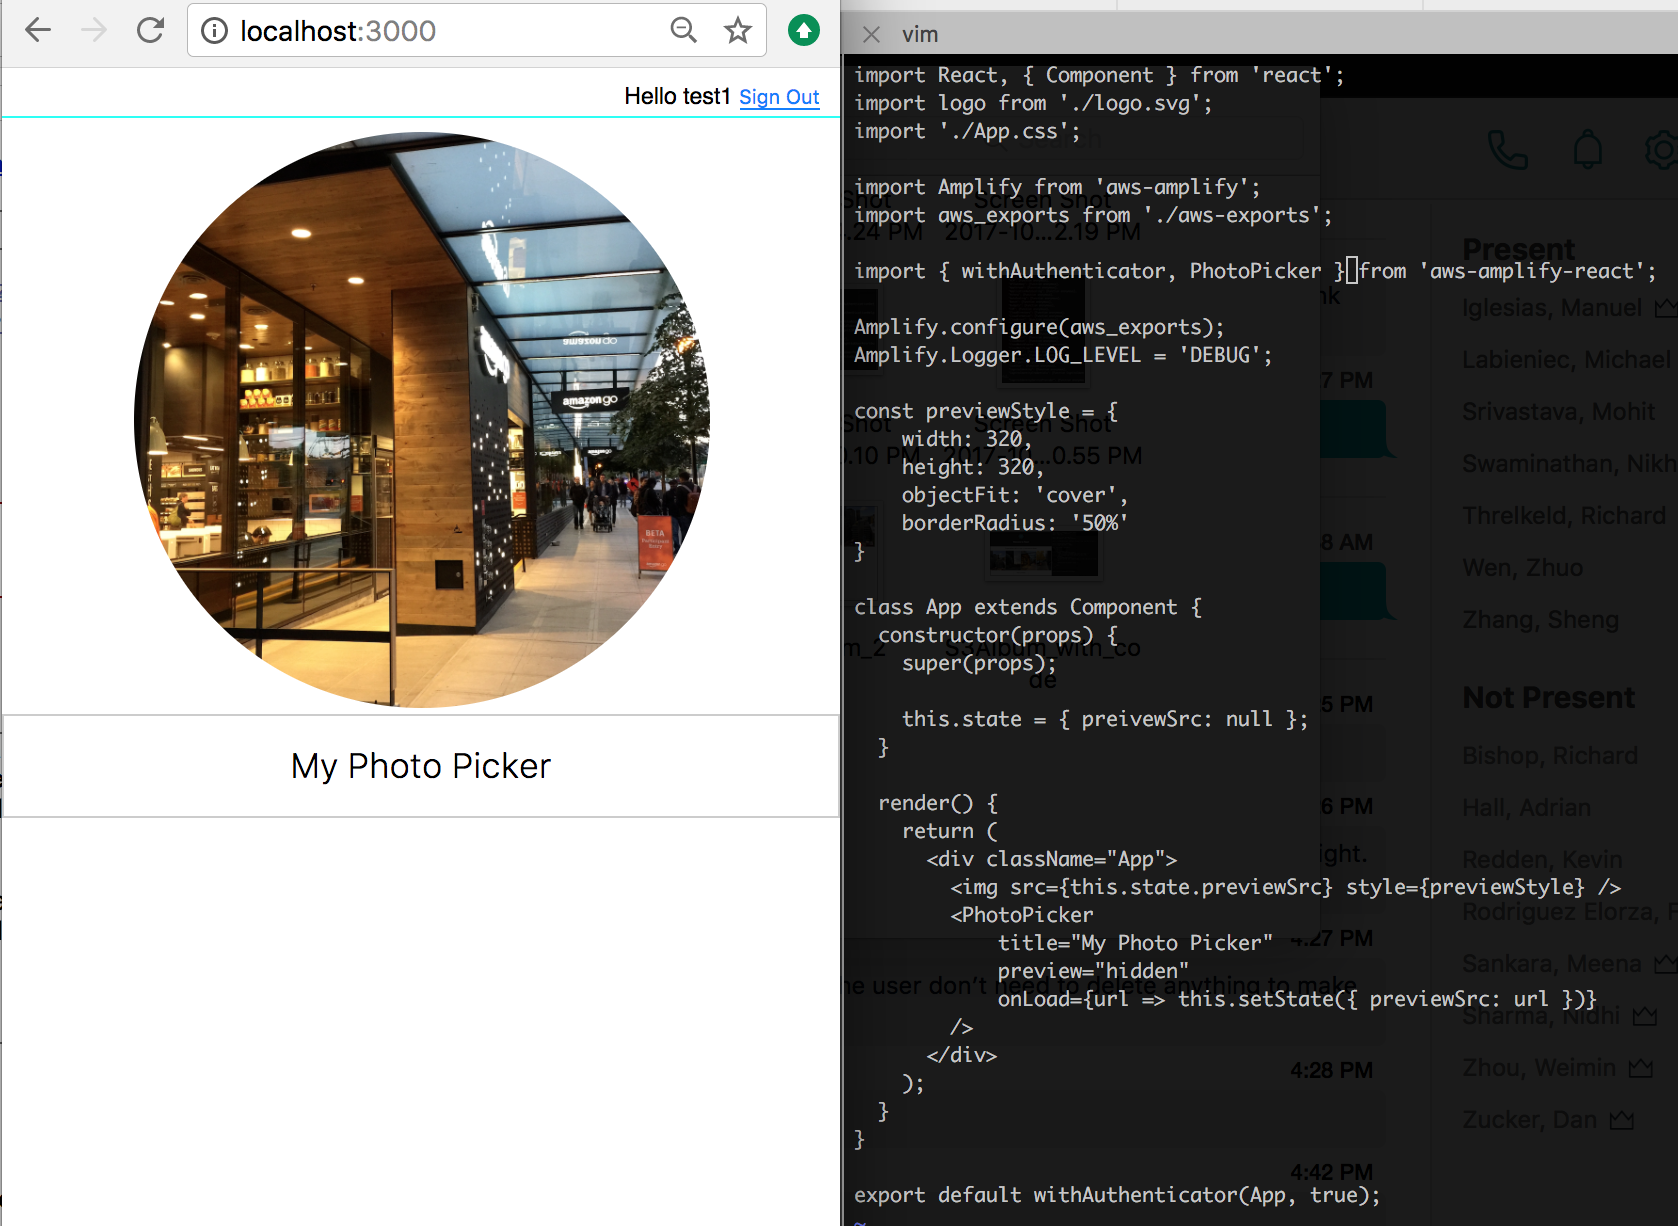
Listen to PhotoPicker onPick event:
import { PhotoPicker } from 'aws-amplify-react';

render() {
    <PhotoPicker onPick={data => console.log(data)} />
}
To display a preview, you can use preview directive:
<PhotoPicker preview onLoad={dataURL => console.log(dataURL)} />
You can retrieve the URL of the image by implementing onLoad action. In this case, you may also want to hide the preview:
<PhotoPicker preview="hidden" onLoad={dataURL => console.log(dataURL)} />
S3Image
S3Image component renders an Amazon S3 object key as an image:
import { S3Image } from 'aws-amplify-react';

render() {
    return <S3Image imgKey={key} />
}
For private images, supply the level property:
return <S3Image level="private" imgKey={key} />
To show another user’s protected image, supply that user’s identityId property as well:
return <S3Image level="protected" identityId={identityId} imgKey={key} />
To initiate an upload, set the body property:
import { S3Image } from 'aws-amplify-react';

render() {
    return <S3Image imgKey={key} body={this.state.image_body} />
}
To hide the image shown in the S3Image, set hidden:
import { S3Image } from 'aws-amplify-react';

render() {
    return <S3Image hidden imgKey={key} />
}
Image URL
S3Image converts path to actual URL. To get the URL, listen to the onLoad event:
<S3Image imgKey={key} onLoad={url => console.log(url)} />
Photo Picker
Set picker property to true on S3Image. A PhotoPicker let the user pick a picture from the device. After users picks an image, the image will be uploaded with imgKey.
<S3Image imgKey={key} picker />
When you set path, the key for the image will be the combination of path and image file name.
<S3Image path={path} picker />
To generate a custom key value, you can provide a callback:
function fileToKey(data) {
    const { name, size, type } = data;
    return 'test_' + name;
}

...
<S3Image path={path} picker fileToKey={fileToKey} />
S3Image will escape all spaces in key values to underscore. For example, ‘a b’ will be converted to ‘a_b’.
S3Text
S3Text is similar to S3Image. The only difference is S3Text is used for text content.
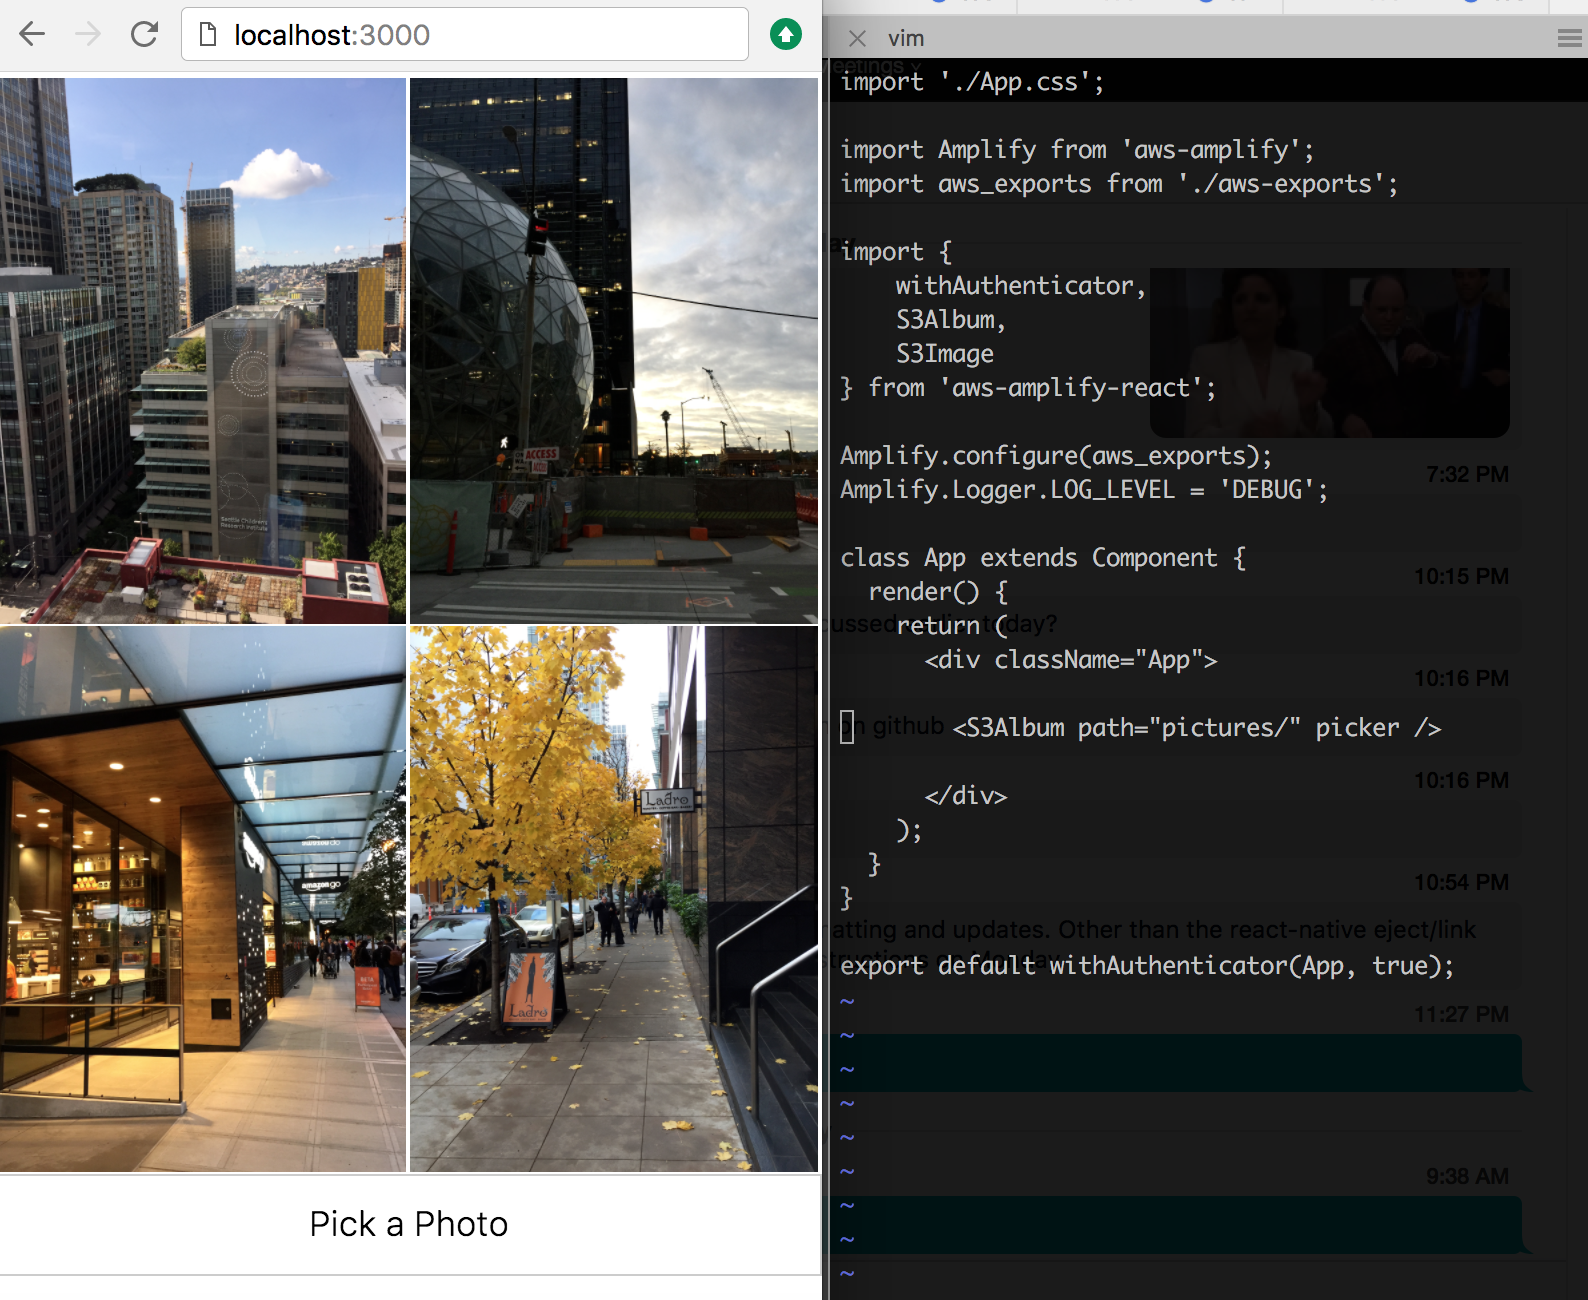
S3Album
S3Album renders a list of S3Image and S3Text objects:
import { S3Album } from 'aws-amplify-react';

render() {
    return <S3Album path={path} />
To display private objects, supply the level property:
return <S3Album level="private" path={path} />
To display another user’s protected objects, supply that user’s identityId property as well:
return <S3Album level="protected" identityId={identityId} path={path} />
You can use filter property customize the path for your album:
return (
    <S3Album
        level="private"
        path={path}
        filter={(item) => /jpg/i.test(item.path)}
    />
);
Picker
Set picker property to true on S3Album. A Picker let user select photos or text files from the device. The selected files will be automatically uploaded to the path.
<S3Album path={path} picker />
By default, photo picker saves images on S3 with filename as the key. To have custom keys, you can provide a callback:
function fileToKey(data) {
    const { name, size, type } = data;
    return 'test_' + name;
}

...
    <S3Album path={path} picker fileToKey={fileToKey} />
S3Album will escape all spaces in key value to underscore. For example, ‘a b’ will be converted to ‘a_b’.
Tracking Events for UI Components
You can automatically track Storage operations on the following React components: S3Album, S3Text, S3Image by providing a track prop:
return <S3Album track />
Enabling tracking will automatically send ‘Storage’ events to Amazon Pinpoint, and you will be able to see the results in AWS Pinpoint console under Custom Events. The event name will be Storage, and event details will be displayed in attributes , e.g. Storage -> Method -> Put.
UI Components for Angular
aws-amplify-angular provides similar storage ui components.
Photo Picker
Add a photo picker to your components template:
<amplify-photo-picker
    (loaded)="onImagePreviewLoaded($event)"
    (picked)="onImageSelected($event)">
</amplify-photo-picker>
S3 Album
Add an S3 album component to your template:
<amplify-s3-album
    path=""
    (selected)="onAlbumImageSelected($event)">
</amplify-s3-album>
See the Angular Guide for usage.
Customization
Customize Upload Path
You can customize your upload path by defining prefixes:
const customPrefix = {
    public: 'myPublicPrefix/',
    protected: 'myProtectedPrefix/',
    private: 'myPrivatePrefix/'
};

Storage.put('test.txt', 'Hello', {
    customPrefix: customPrefix,
    // ...
})
.then (result => console.log(result))
.catch(err => console.log(err));
For example, if you want to enable read, write and delete operation for all the objects under path myPublicPrefix/, declare it in your IAM policy:
"Statement": [
    {
        "Effect": "Allow",
        "Action": [
            "s3:GetObject",
            "s3:PutObject",
            "s3:DeleteObject"
        ],
        "Resource": [
            "arn:aws:s3:::your-s3-bucket/myPublicPrefix/*",
        ]
    }
]
If you want to have custom private path prefix like myPrivatePrefix/, you need to add it into your IAM policy:
"Statement": [
    {
        "Effect": "Allow",
        "Action": [
            "s3:GetObject",
            "s3:PutObject",
            "s3:DeleteObject"
        ],
        "Resource": [
            "arn:aws:s3:::your-s3-bucket/myPrivatePrefix/${cognito-identity.amazonaws.com:sub}/*"
        ]
    }
]
This ensures only the authenticated users has the access to the objects under the path.
Using Modular Imports
If you only need to use Storage, you can do: npm install @aws-amplify/storage which will only install the Storage module for you.
Note: if you’re using Cognito Federated Identity Pool to get AWS credentials, please also install @aws-amplify/auth.
Then in your code, you can import the Storage module by:
import Storage from '@aws-amplify/storage';

Storage.configure();