

Push Notifications
Overview
Enable your users to receive mobile push messages sent from the Apple (APNs) and Google (FCM/GCM) platforms. The CLI deploys your push notification backend using Amazon Pinpoint. You can also create Amazon Pinpoint campaigns that tie user behavior to push or other forms of messaging.
Set Up Your Backend
-
Complete the Get Started steps before you proceed.
-
Complete the Setting Up APNS Guide. This will guide you through the process of setting up an App ID, SSL certificate, provisioning profile, entitlements, distribution certificate, and provisioning profile, which are required to deliver notifications to iOS devices.
-
Use the CLI to add notifications to your cloud-enabled backend and app.
In a terminal window, navigate to your project folder (the folder that typically contains your project level
xcodeprojfile), and add the SDK to your app.$ cd ./YOUR_PROJECT_FOLDER $ amplify add notifications -
Set up your backend to support receiving push notifications:
-
Choose Apple Push Notification Service (APNs).
> APNS -
Choose Certificate as your authentication method.
> Certificate -
Provide the path to your P12 certificate that you created in Setting Up iOS Push Notifications.
Use the steps in the next section to connect your app to your backend.
-
Connect to Your Backend
Use the following steps to connect add push notification backend services to your app.
-
The
Podfilethat you configure to install the AWS Mobile SDK must contain theAWSPinpointpod:platform :ios, '9.0' target :'YOUR-APP-NAME' do use_frameworks! pod 'AWSPinpoint', '~> 2.13.0' # other pods pod 'AWSMobileClient', '~> 2.13.0' endRun
pod install --repo-updatebefore you continue.If you encounter an error message that begins
[!] Failed to connect to GitHub to update the CocoaPods/Specs..., and your internet connectivity is working, you may need to update openssl and Ruby. -
Classes that call Amazon Pinpoint APIs must use the following import statements:
import AWSPinpoint import AWSMobileClient -
To receive push notifications with Amazon Pinpoint, you’ll instantiate a Pinpoint instance and register your device token with Amazon Pinpoint. We recommend you do this during app startup, so your users can begin receiving notifications as early as possible.
Note: If you have already integrated
Analytics, you can skip this step.Edit the
application(_:didFinishLaunchingWithOptions:)method of your app’sAppDelegate.swiftby adding apinpointinstance property, and initializing the Pinpoint client as shown below:class AppDelegate: UIResponder, UIApplicationDelegate { /** start code copy **/ var pinpoint: AWSPinpoint? /** end code copy **/ func application(_ application: UIApplication, didFinishLaunchingWithOptions launchOptions: [UIApplicationLaunchOptionsKey: Any]?) -> Bool { // Other didFinishLaunching code... /** start code copy **/ // Create AWSMobileClient to connect with AWS AWSMobileClient.default().initialize { (userState, error) in if let error = error { print("Error initializing AWSMobileClient: \(error.localizedDescription)") } else if let userState = userState { print("AWSMobileClient initialized. Current UserState: \(userState.rawValue)") } } // Initialize Pinpoint let pinpointConfiguration = AWSPinpointConfiguration.defaultPinpointConfiguration(launchOptions: launchOptions) pinpoint = AWSPinpoint(configuration: pinpointConfiguration) /** end code copy **/ return true } }
Manual Configuration
As an alternative to automatic configuration using the Amplify CLI, you can manually enter the necessary configurations. Here is a snippet of the relevant sections of the awsconfiguration.json file:
{
    "Version": "0.1.0",
    "IdentityManager": {
        "Default": {}
    },
    "CredentialsProvider": {
        "CognitoIdentity": {
            "Default": {
                "PoolId": "COGNITO-IDENTITY-POOL-ID",
                "Region": "COGNITO-IDENTITY-POOL-REGION"
            }
        }
    },
    "CognitoUserPool": {
        "Default": {
            "PoolId": "COGNITO-USER-POOL-ID",
            "AppClientId": "COGNITO-USER-APP-CLIENT-ID",
            "AppClientSecret": "COGNITO-USER-POOL-APP-CLIENT-SECRET",
            "Region": "COGNITO-USER-POOL-REGION"
        }
    },
    "PinpointAnalytics": {
        "Default": {
            "AppId": "PINPOINT-APP-ID",
            "Region": "PINPOINT-REGION"
        }
    },
    "PinpointTargeting": {
        "Default": {
            "Region": "PINPOINT-REGION"
        }
    }
}
Make the following changes to the configuration file. The values are available in the AWS Console.
- CognitoIdentity
- Replace
COGNITO-IDENTITY-POOL-IDwith the identity pool ID. - Replace
COGNITO-IDENTITY-POOL-REGIONwith the Region the identity pool was created in.
- Replace
- CognitoUserPool
- Replace
COGNITO-USER-POOL-IDwith the user pool ID. - Replace
COGNITO-USER-POOL-REGIONwith the Region the user pool was created in. - Replace
COGNITO-USER-APP-CLIENT-IDwith the app client id that has access to the user pool. - Replace
COGNITO-USER-POOL-APP-CLIENT-SECRETwith the app client secret for the app client id. - Replace
COGNITO-USER-POOL-REGIONwith the Region the user pool was created in.
- Replace
- PinpointAnalytics
- Replace
PINPOINT-APP-IDwith the Project Id of the Pinpoint project. - Replace
PINPOINT-REGIONwith the Region the Pinpoint project was created in.
- Replace
- PinpointTargeting
- Replace
PINPOINT-REGIONwith the Region the Pinpoint project was created in.
- Replace
Add Amazon Pinpoint Targeted and Campaign Push Messaging
The Amazon Pinpoint console enables you to target your app users with push messaging. You can send individual messages or configure campaigns that target a group of users that match a profile that you define. For instance, you could email users that have not used the app in 30 days, or send an SMS to those that frequently use a given feature of your app.
The following steps show how to receive push notifications targeted for your app.
-
To receive Amazon Pinpoint push notification to your app, you’ll use
pinpoint.notificationManagerto intercept the registration of the app for notifications in theapplication(_:didRegisterForRemoteNotificationsWithDeviceToken:)application call back in AppDelegate.Then add and call a function like
registerForPushNotifications()to prompt permission from the user for the app to use notifications. The following example uses theUNUserNotificationframework, which is available in iOS 10.0+. Choose the right location in your app to prompt the user for permissions. In the following example the call is implemented in theapplication(_:didFinishLaunchingWithOptions:)event in AppDelegate. This causes the prompt to appear when the app launches.import UserNotifications // Other imports... class AppDelegate: UIResponder, UIApplicationDelegate { // Other app delegate methods... func application(_ application: UIApplication, didFinishLaunchingWithOptions launchOptions: [UIApplication.LaunchOptionsKey: Any]?) -> Bool { // Other didFinishLaunching code, including Pinpoint initialization... registerForPushNotifications() // Other didFinishLaunching code... } func application( _ application: UIApplication, didRegisterForRemoteNotificationsWithDeviceToken deviceToken: Data) { pinpoint!.notificationManager.interceptDidRegisterForRemoteNotifications( withDeviceToken: deviceToken) } func application( _ application: UIApplication, didReceiveRemoteNotification userInfo: [AnyHashable: Any], fetchCompletionHandler completionHandler: @escaping (UIBackgroundFetchResult) -> Void) { pinpoint!.notificationManager.interceptDidReceiveRemoteNotification( userInfo, fetchCompletionHandler: completionHandler) if (application.applicationState == .active) { let alert = UIAlertController(title: "Notification Received", message: userInfo.description, preferredStyle: .alert) alert.addAction(UIAlertAction(title: "Ok", style: .default, handler: nil)) UIApplication.shared.keyWindow?.rootViewController?.present( alert, animated: true, completion:nil) } } // Request user to grant permissions for the app to use notifications func registerForPushNotifications() { UNUserNotificationCenter.current().delegate = self UNUserNotificationCenter.current().requestAuthorization(options: [.alert, .sound, .badge]) { (granted, error) in print("Permission granted: \(granted)") // 1. Check if permission granted guard granted else { return } // 2. Attempt registration for remote notifications on the main thread DispatchQueue.main.async { UIApplication.shared.registerForRemoteNotifications() } } } // Other app delegate methods... }Note: If you already have push notification delegate methods, you can just add the
interceptDidRegisterForRemoteNotificationsandinterceptDidReceiveRemoteNotificationcallbacks to Pinpoint client. -
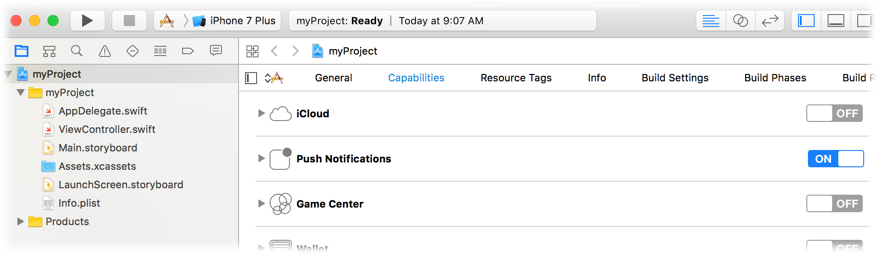
In Xcode Project Navigator, choose your app name at the top, choose your app name under Targets, choose the Capabilities tab, and then turn on Push Notifications.
-
Configure the app to run in the Release profile instead of the default Debug profile. Perform the following steps to get a notification to the device:
-
For your app target, go to the General tab of project configuration and make sure Automatically Manage Signing check box is not selected.
-
In the Signing (Release) section, choose the production provisioning profile you created on Apple developer console. For testing push notifications on a device, you will need an Ad Hoc Provisioning Profile configured with a Production AppStore and Ad Hoc certificate, and with the device(s) to be used for testing.
-
In the top left corner of Xcode (where your app name is displayed next to the current build target device), choose on your app name and then select Edit Scheme, and then set Build configuration to Release
Note: Run your app on an iPhone device to test. Push notifications are not supported on simulators.
-
Xcode will give an error that it could not run the app, this is due to production profile apps not being allowed to debug. Click Ok and launch the app directly from the device.
-
When prompted, chose to allow notifications for the device.
-
To create a new campaign to send notifications to your app from the Amazon Pinpoint console run the following command from your app project folder.
$ cd YOUR_APP_PROJECT_FOLDER $ amplify notifications console -
Provide a campaign name, choose Next, choose Filter by standard attributes, and then choose iOS as the platform.
-
You should see 1 device as a targeted endpoint, which is the app we are running on the iPhone device. Choose the option and then choose Next Step.
-
Provide text for a sample title and body for push notification, and then choose Next Step.
-
Choose Immediate, and then choose Next Step.
-
Review the details on the screen, and then choose Launch Campaign.
-
A notification should appear on the iPhone device. You may want to try testing your app receiving notifications when it is in the foreground and when closed.
-