

Authentication
AWS Amplify Authentication module provides Authentication APIs and building blocks for developers who want to create user authentication experiences.
Amazon Cognito
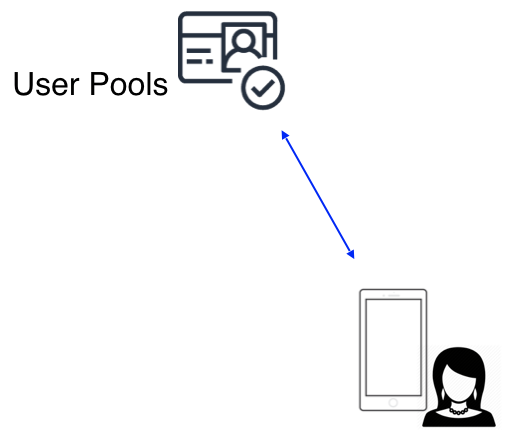
Amazon Cognito User Pools is a full-featured user directory service to handle user registration, authentication, and account recovery. Amazon Cognito Federated Identities on the other hand, is a way to authorize your users to use AWS services.
Amplify interfaces with User Pools to store your user information, including federation with other OpenID providers like Facebook & Google, and it leverages Federated Identities to manage user access to AWS Resources, for example allowing a user to upload a file to an S3 bucket. The Amplify CLI automates the access control policies for these AWS resources as well as provides fine grained access controls via GraphQL for protecting data in your APIs.
Prerequisite: Install and configure the Amplify CLI
Recommendation: Complete the Getting Started guide
Concepts
Authentication is a process to validate who you are (abbreviated as AuthN). The system which does this validation is referred to as an Identity Provider or IdP. This can be your own self-hosted IdP or a cloud service. Oftentimes, this IdP is a social provider such as Facebook, Google, or Amazon (“Social Sign-In”).
Authorization is the process of validating what you can access (abbreviated as AuthZ). This is sometimes done by looking at tokens with custom logic, predefined rules, or signed requests with policies.
In the Amplify ecosystem, the most common Authentication method is either using Cognito User Pools independently or with a social provider to validate the identity of the user (known as Federation). Authorization is often done in one of two ways:
- Clients pass the tokens to the backend that perform custom logic to allow or deny actions
- Clients sign the requests and the backend validates the signature, allowing or denying actions depending on predefined policy
The first method is common with REST or GraphQL APIs, however you can also use the second for these services as well (AWS AppSync and Amazon API Gateway). The second method is necessary for services such as S3, Pinpoint, Sumerian, and others. The predefined rules are known as IAM policies and automatically configured by the Amplify CLI.
Below are the 3 most common Auth architectures using the Amplify Framework.
Simple Auth
For many apps, user sign-up and sign-in is all that is required. Once authenticated the app can talk to an API such as AWS AppSync or API Gateway. In this case, you can simply create a User Pool by running amplify add auth using the Amplify CLI and selecting the default setup. In your application you can use Auth.signUp and Auth.signIn (or an Amplify UI component) to complete this process and retrieve tokens. The Amplify client will refresh the tokens calling Auth.currentSession if they are no longer valid.
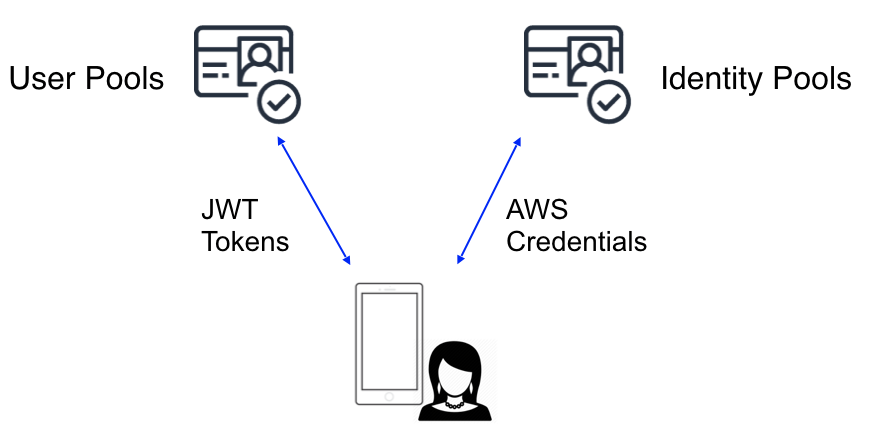
AWS Auth
Some apps need to use AWS services which require signing requests. Examples of this would be storing images or videos on S3, or sending analytics to Pinpoint or Kinesis. Amplify automatically signs requests with short term credentials from a Cognito Identity Pool which automatically expire, rotate, and refresh by the Amplify client libraries. Setting up your backend with amplify add auth and calling Auth.signIn will automatically do this for you as well after the client authenticates. The diagram below shows how JWT tokens are returned from User Pools and AWS credentials from Identity Pools. You can access these at any time with Auth.currentSession() and Auth.currentCredentials().
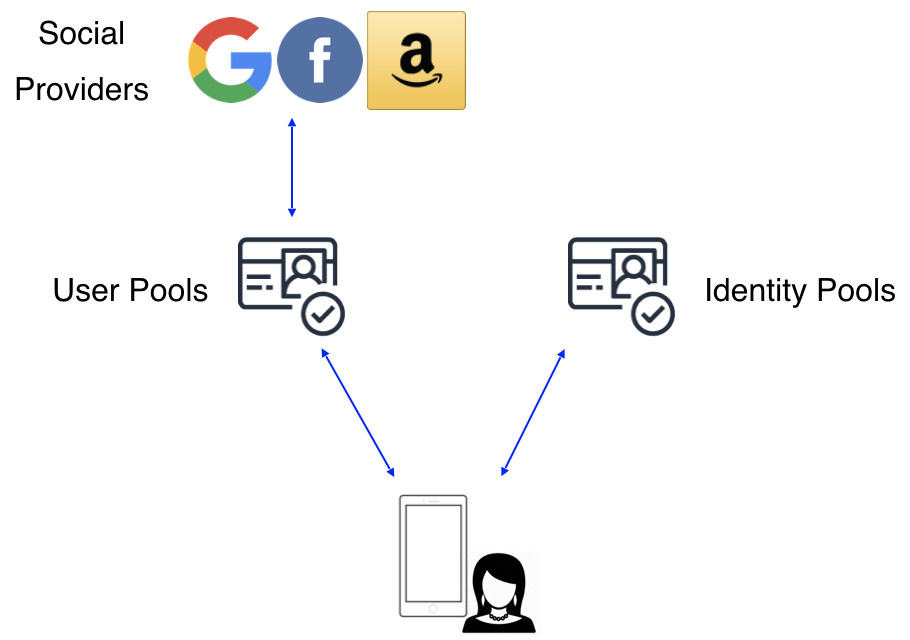
Social Provider Federation
Many apps also support login with a social provider such as Facebook, Google Sign-In, or Login With Amazon. The preferred way to do this is via an OAuth redirect which lets users login using their social media account and a corresponding user is created in User Pools. With this design you do not need to include an SDK for the social provider in your app. Set this up by running amplify add auth and selecting the social provider option. Upon completion you can use Auth.federatedSignIn() in your application to either show a pre-built “Hosted UI” or pass in a provider name (e.g. Auth.federatedSignIn({provider: 'Facebook'})) to interface directly and build out your own UI.
You can also get credentials directly from Identity Pools by passing tokens from a provider directly to Auth.federatedSignIn(). However you will have to use that provider’s SDK directly in your app and manage token refresh and auth flows manually.
Automated Setup
Run the following command in your project’s root folder:
$ amplify add auth
If you have previously enabled an Amplify category that uses Auth behind the scenes, e.g. API category, you may already have an Auth configuration. In such a case, run amplify auth update command to edit your configuration.
The CLI prompts will help you to customize your auth flow for your app. With the provided options, you can:
- Customize sign-in/registration flow
- Customize email and SMS messages for Multi-Factor Authentication
- Customize attributes for your users, e.g. name, email
- Enable 3rd party social providers, e.g. Facebook, Twitter, Google and Amazon
If you wish to federate with social providers you will need to configure them first.
After configuring your Authentication options, update your backend:
$ amplify push
A configuration file called aws-exports.js will be copied to your configured source directory, for example ./src.
NOTE: If your Authentication resources were created with Amplify CLI version 1.6.4 and below, you will need to manually update your project to avoid Node.js runtime issues with AWS Lambda. Read more
Lambda Triggers
The CLI allows you to configure Lambda Triggers for your AWS Cognito User Pool. These enable you to add custom functionality to your registration and authentication flows. Read more
Many Cognito Lambda Triggers accept unsanitized key/value pairs in the form of a ‘ClientMetadata’ attribute. To configure a static set of key/value pairs, you can define a clientMetadata key in the Auth.configure function. You can also pass a clientMetadata parameter to the various Auth functions which result in Cognito Lambda Trigger execution. These functions include:
Auth.changePasswordAuth.completeNewPasswordAuth.confirmSignInAuth.confirmSignUpAuth.forgotPasswordSubmitAuth.resendSignUpAuth.sendCustomChallengeAnswerAuth.signInAuth.signUpAuth.updateUserAttributesAuth.verifyUserAttribute
Please note that some of triggers which accept a ‘validationData’ attribute will use clientMetadata as the value for validationData. Exercise caution with using clientMetadata when you are relying on validationData.
Configure Your App
Add Amplify to your app with yarn or npm:
yarn add aws-amplify
For React Native applications, install aws-amplify-react-native and link:
yarn add aws-amplify aws-amplify-react-native
react-native link amazon-cognito-identity-js # DO NOT run this when using Expo or ExpoKit
If you are using React Native 0.60.0+, iOS and using Auth methods e.g. Auth.signIn, Auth.signUp, etc., please run the following commands instead of linking:
yarn add amazon-cognito-identity-js
cd ios
pod install --repo-update
In your app’s entry point i.e. App.js, import and load the configuration file:
import Amplify, { Auth } from 'aws-amplify';
import awsconfig from './aws-exports';
Amplify.configure(awsconfig);
Manual Setup
For manual configuration you need to provide your AWS Resource configuration:
import Amplify, { Auth } from 'aws-amplify';

Amplify.configure({
    Auth: {

        // REQUIRED only for Federated Authentication - Amazon Cognito Identity Pool ID
        identityPoolId: 'XX-XXXX-X:XXXXXXXX-XXXX-1234-abcd-1234567890ab',

        // REQUIRED - Amazon Cognito Region
        region: 'XX-XXXX-X',

        // OPTIONAL - Amazon Cognito Federated Identity Pool Region
        // Required only if it's different from Amazon Cognito Region
        identityPoolRegion: 'XX-XXXX-X',

        // OPTIONAL - Amazon Cognito User Pool ID
        userPoolId: 'XX-XXXX-X_abcd1234',

        // OPTIONAL - Amazon Cognito Web Client ID (26-char alphanumeric string)
        userPoolWebClientId: 'a1b2c3d4e5f6g7h8i9j0k1l2m3',

        // OPTIONAL - Enforce user authentication prior to accessing AWS resources or not
        mandatorySignIn: false,

        // OPTIONAL - Configuration for cookie storage
        // Note: if the secure flag is set to true, then the cookie transmission requires a secure protocol
        cookieStorage: {
        // REQUIRED - Cookie domain (only required if cookieStorage is provided)
            domain: '.yourdomain.com',
        // OPTIONAL - Cookie path
            path: '/',
        // OPTIONAL - Cookie expiration in days
            expires: 365,
        // OPTIONAL - Cookie secure flag
        // Either true or false, indicating if the cookie transmission requires a secure protocol (https).
            secure: true
        },

        // OPTIONAL - customized storage object
        storage: new MyStorage(),

        // OPTIONAL - Manually set the authentication flow type. Default is 'USER_SRP_AUTH'
        authenticationFlowType: 'USER_PASSWORD_AUTH',

        // OPTIONAL - Manually set key value pairs that can be passed to Cognito Lambda Triggers
        clientMetadata: { myCustomKey: 'myCustomValue' },

         // OPTIONAL - Hosted UI configuration
        oauth: {
            domain: 'your_cognito_domain',
            scope: ['phone', 'email', 'profile', 'openid', 'aws.cognito.signin.user.admin'],
            redirectSignIn: 'http://localhost:3000/',
            redirectSignOut: 'http://localhost:3000/',
            responseType: 'code' // or 'token', note that REFRESH token will only be generated when the responseType is code
        }
    }
});

// You can get the current config object
const currentConfig = Auth.configure();
Working with the API
Common Authentication Use Cases
The Authentication category exposes a set of APIs to be used in any JavaScript framework. Please check AWS Amplify API Reference for full API list.
Sign In
When signing in with user name and password, you will either sign in directly or be asked to pass some challenges before getting authenticated.
The user object returned from Auth.signIn will contain challengeName and challengeParam if the user needs to pass those challenges. You can call corresponding functions based on those two parameters.
ChallengeName:
SMS_MFA: The user needs to input the code received from SMS message. You can submit the code byAuth.confirmSignIn.SOFTWARE_TOKEN_MFA: The user needs to input the OTP(one time password). You can submit the code byAuth.confirmSignIn.NEW_PASSWORD_REQUIRED: This happens when the user account is created through the Cognito console. The user needs to input the new password and required attributes. You can submit those data byAuth.completeNewPassword.MFA_SETUP: This happens when the MFA method is TOTP(the one time password) which requires the user to go through some steps to generate those passwords. You can start the setup process byAuth.setupTOTP.
The following code is only for demonstration purpose:
import { Auth } from 'aws-amplify';

async function SignIn() {
    try {
        const user = await Auth.signIn(username, password);
        if (user.challengeName === 'SMS_MFA' ||
            user.challengeName === 'SOFTWARE_TOKEN_MFA') {
            // You need to get the code from the UI inputs
            // and then trigger the following function with a button click
            const code = getCodeFromUserInput();
            // If MFA is enabled, sign-in should be confirmed with the confirmation code
            const loggedUser = await Auth.confirmSignIn(
                user,   // Return object from Auth.signIn()
                code,   // Confirmation code
                mfaType // MFA Type e.g. SMS_MFA, SOFTWARE_TOKEN_MFA
            );
        } else if (user.challengeName === 'NEW_PASSWORD_REQUIRED') {
            const {requiredAttributes} = user.challengeParam; // the array of required attributes, e.g ['email', 'phone_number']
            // You need to get the new password and required attributes from the UI inputs
            // and then trigger the following function with a button click
            // For example, the email and phone_number are required attributes
            const {username, email, phone_number} = getInfoFromUserInput();
            const loggedUser = await Auth.completeNewPassword(
                user,              // the Cognito User Object
                newPassword,       // the new password
                // OPTIONAL, the required attributes
                {
                    email,
                    phone_number,
                }
            );
        } else if (user.challengeName === 'MFA_SETUP') {
            // This happens when the MFA method is TOTP
            // The user needs to setup the TOTP before using it
            // More info please check the Enabling MFA part
            Auth.setupTOTP(user);
        } else {
            // The user directly signs in
            console.log(user);
        }
    } catch (err) {
        if (err.code === 'UserNotConfirmedException') {
            // The error happens if the user didn't finish the confirmation step when signing up
            // In this case you need to resend the code and confirm the user
            // About how to resend the code and confirm the user, please check the signUp part
        } else if (err.code === 'PasswordResetRequiredException') {
            // The error happens when the password is reset in the Cognito console
            // In this case you need to call forgotPassword to reset the password
            // Please check the Forgot Password part.
        } else if (err.code === 'NotAuthorizedException') {
            // The error happens when the incorrect password is provided
        } else if (err.code === 'UserNotFoundException') {
            // The error happens when the supplied username/email does not exist in the Cognito user pool
        } else {
            console.log(err);
        }
    }
}
// For advanced usage
// You can pass an object which has the username, password and validationData which is sent to a PreAuthentication Lambda trigger
Auth.signIn({
    username, // Required, the username
    password, // Optional, the password
    validationData, // Optional, a random key-value pair map which can contain any key and will be passed to your PreAuthentication Lambda trigger as-is. It can be used to implement additional validations around authentication
}).then(user => console.log(user))
.catch(err => console.log(err));
Sign Up
Creates a new user in your User Pool:
import { Auth } from 'aws-amplify';

Auth.signUp({
    username,
    password,
    attributes: {
        email,          // optional
        phone_number,   // optional - E.164 number convention
        // other custom attributes
    },
    validationData: []  //optional
    })
    .then(data => console.log(data))
    .catch(err => console.log(err));

// After retrieving the confirmation code from the user
Auth.confirmSignUp(username, code, {
    // Optional. Force user confirmation irrespective of existing alias. By default set to True.
    forceAliasCreation: true
}).then(data => console.log(data))
  .catch(err => console.log(err));

Auth.resendSignUp(username).then(() => {
    console.log('code resent successfully');
}).catch(e => {
    console.log(e);
});
The Auth.signUp promise returns a data object of type ISignUpResult with a CognitoUser.
{
    user: CognitoUser;
    userConfirmed: boolean;
    userSub: string;
}
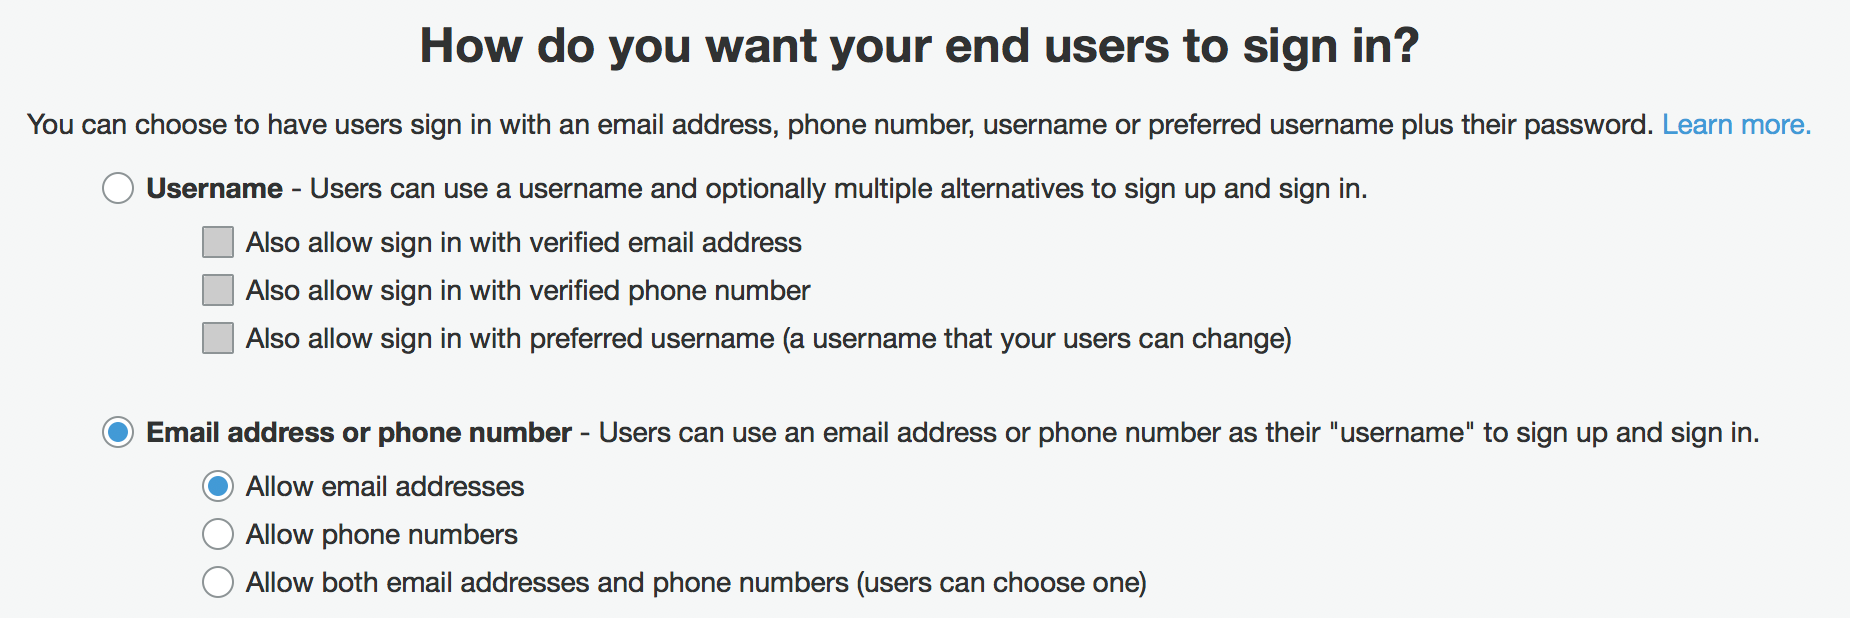
Forcing Email Uniqueness in Cognito User Pools
When your Cognito User Pool sign-in options are set to “Username”, and “Also allow sign in with verified email address”, the signUp() method creates a new user account every time it’s called, without validating email uniqueness. In this case you will end up having multiple user pool identities and all previously created accounts will have their email_verified attribute changed to false.
To enforce Cognito User Pool signups with a unique email, you need to change your User Pool’s Attributes setting in Amazon Cognito console as the following:
Sign Out
import { Auth } from 'aws-amplify';

Auth.signOut()
    .then(data => console.log(data))
    .catch(err => console.log(err));

// By doing this, you are revoking all the auth tokens(id token, access token and refresh token)
// which means the user is signed out from all the devices
// Note: although the tokens are revoked, the AWS credentials will remain valid until they expire (which by default is 1 hour)
Auth.signOut({ global: true })
    .then(data => console.log(data))
    .catch(err => console.log(err));
Change password
import { Auth } from 'aws-amplify';

Auth.currentAuthenticatedUser()
    .then(user => {
        return Auth.changePassword(user, 'oldPassword', 'newPassword');
    })
    .then(data => console.log(data))
    .catch(err => console.log(err));
Forgot Password
import { Auth } from 'aws-amplify';

Auth.forgotPassword(username)
    .then(data => console.log(data))
    .catch(err => console.log(err));

// Collect confirmation code and new password, then
Auth.forgotPasswordSubmit(username, code, new_password)
    .then(data => console.log(data))
    .catch(err => console.log(err));
Complete new password
The user would be asked to provide the new password and required attributes during the first sign-in attempt if a valid user directory is created in Amazon Cognito. During this scenario, the following method can be called to process the new password entered by the user.
import { Auth } from 'aws-amplify';

Auth.signIn(username, password)
.then(user => {
    if (user.challengeName === 'NEW_PASSWORD_REQUIRED') {
        const { requiredAttributes } = user.challengeParam; // the array of required attributes, e.g ['email', 'phone_number']
        Auth.completeNewPassword(
            user,               // the Cognito User Object
            newPassword,       // the new password
            // OPTIONAL, the required attributes
            {
              email: 'xxxx@example.com',
              phone_number: '1234567890'
            }
        ).then(user => {
            // at this time the user is logged in if no MFA required
            console.log(user);
        }).catch(e => {
          console.log(e);
        });
    } else {
        // other situations
    }
}).catch(e => {
    console.log(e);
});
Verify phone_number or email address
Either the phone number or the email address is required for account recovery. You can let the user verify those attributes by:
// To initiate the process of verifying the attribute like 'phone_number' or 'email'
Auth.verifyCurrentUserAttribute(attr)
.then(() => {
     console.log('a verification code is sent');
}).catch((e) => {
     console.log('failed with error', e);
});

// To verify attribute with the code
Auth.verifyCurrentUserAttributeSubmit(attr, 'the_verification_code')
.then(() => {
     console.log('phone_number verified');
}).catch(e => {
     console.log('failed with error', e);
});
Retrieve Current Authenticated User
You can call Auth.currentAuthenticatedUser() to get the current authenticated user object.
import { Auth } from 'aws-amplify';

Auth.currentAuthenticatedUser({
    bypassCache: false  // Optional, By default is false. If set to true, this call will send a request to Cognito to get the latest user data
}).then(user => console.log(user))
.catch(err => console.log(err));
This method can be used to check if a user is logged in when the page is loaded. It will throw an error if there is no user logged in.
This method should be called after the Auth module is configured or the user is logged in. To ensure that you can listen on the auth events configured or signIn. Learn how to listen on auth events.
Retrieve Current Session
Auth.currentSession() returns a CognitoUserSession object which contains JWT accessToken, idToken, and refreshToken.
This method will automatically refresh the accessToken and idToken if tokens are expired and a valid refreshToken presented. So you can use this method to refresh the session if needed.
import { Auth } from 'aws-amplify';

Auth.currentSession()
    .then(data => console.log(data))
    .catch(err => console.log(err));
Managing Security Tokens
When using Authentication with AWS Amplify, you don’t need to refresh Amazon Cognito tokens manually. The tokens are automatically refreshed by the library when necessary.
Security Tokens like IdToken or AccessToken are stored in localStorage for the browser and in AsyncStorage for React Native. If you want to store those tokens in a more secure place or you are using Amplify in server side, then you can provide your own storage object to store those tokens.
For example:
class MyStorage {
    // the promise returned from sync function
    static syncPromise = null;
    // set item with the key
    static setItem(key: string, value: string): string;
    // get item with the key
    static getItem(key: string): string;
    // remove item with the key
    static removeItem(key: string): void;
    // clear out the storage
    static clear(): void;
    // If the storage operations are async(i.e AsyncStorage)
    // Then you need to sync those items into the memory in this method
    static sync(): Promise<void> {
        if (!MyStorage.syncPromise) {
            MyStorage.syncPromise = new Promise((res, rej) => {});
        }
        return MyStorage.syncPromise;
    }
}

// tell Auth to use your storage object
Auth.configure({
    storage: MyStorage
});
Here is the example of how to use AsyncStorage as your storage object which will show you how to sync items from AsyncStorage into Memory:
import { AsyncStorage } from 'react-native';

const MEMORY_KEY_PREFIX = '@MyStorage:';
let dataMemory = {};

/** @class */
class MyStorage {
    static syncPromise = null;
    /**
     * This is used to set a specific item in storage
     */
    static setItem(key, value) {
        AsyncStorage.setItem(MEMORY_KEY_PREFIX + key, value);
        dataMemory[key] = value;
        return dataMemory[key];
    }

    /**
     * This is used to get a specific key from storage
     */
    static getItem(key) {
        return Object.prototype.hasOwnProperty.call(dataMemory, key) ? dataMemory[key] : undefined;
    }

    /**
     * This is used to remove an item from storage
     */
    static removeItem(key) {
        AsyncStorage.removeItem(MEMORY_KEY_PREFIX + key);
        return delete dataMemory[key];
    }

    /**
     * This is used to clear the storage
     */
    static clear() {
        dataMemory = {};
        return dataMemory;
    }

    /**
     * Will sync the MemoryStorage data from AsyncStorage to storageWindow MemoryStorage
    */
    static sync() {
        if (!MemoryStorage.syncPromise) {
            MemoryStorage.syncPromise =  new Promise((res, rej) => {
                AsyncStorage.getAllKeys((errKeys, keys) => {
                    if (errKeys) rej(errKeys);
                    const memoryKeys = keys.filter((key) => key.startsWith(MEMORY_KEY_PREFIX));
                    AsyncStorage.multiGet(memoryKeys, (err, stores) => {
                        if (err) rej(err);
                        stores.map((result, index, store) => {
                            const key = store[index][0];
                            const value = store[index][1];
                            const memoryKey = key.replace(MEMORY_KEY_PREFIX, '');
                            dataMemory[memoryKey] = value;
                        });
                        res();
                    });
                });
            });
        }
        return MemoryStorage.syncPromise;
    }
}

Auth.configure({
    storage: MyStorage
});
To learn more about tokens, please visit Amazon Cognito Developer Documentation.
Using Auth Components in React & React Native
Using withAuthenticator HOC
For React and React Native apps, the simplest way to add authentication flows into your app is to use the withAuthenticator Higher Order Component.
If you are using the withAuthenticator HOC with React Native, make sure to link react-native-vector-icons and then (re)launch your app:
react-native link react-native-vector-icons
react-native run-ios
withAuthenticator automatically detects the authentication state and updates the UI. If the user is signed in, the underlying component (typically your app’s main component) is displayed otherwise signin/signup controls are displayed.
The default implementation uses the Amplify UI styling, for an example of what that looks like out of the box on web and mobile, see here.
Just add these two lines to your App.js:
import { withAuthenticator } from 'aws-amplify-react'; // or 'aws-amplify-react-native';
import Amplify from 'aws-amplify';
// Get the aws resources configuration parameters
import awsconfig from './aws-exports'; // if you are using Amplify CLI

Amplify.configure(awsconfig);

// ...

export default withAuthenticator(App);
Now, your app has complete flows for user sign-in and registration. Since you have wrapped your App with withAuthenticator, only signed in users can access your app. The routing for login pages and giving access to your App Component will be managed automatically.
withAuthenticator component renders your App component after a successful user signed in, and it prevents non-sign-in users to interact with your app. In this case, we need to display a sign-out button to trigger the related process.
To display a sign-out button or customize other, set includeGreetings = true in the parameter object. It displays a greetings section on top of your app, and a sign-out button is displayed in the authenticated state. Other customization options are also available as properties to the HOC:
export default withAuthenticator(App, {
                // Render a sign out button once logged in
                includeGreetings: true,
                // Show only certain components
                authenticatorComponents: [MyComponents],
                // display federation/social provider buttons
                federated: {myFederatedConfig},
                // customize the UI/styling
                theme: {myCustomTheme}});
Using the Authenticator Component
The withAuthenticator HOC wraps an Authenticator component. Using Authenticator directly gives you more customization options for your UI.
<Authenticator
    // Optionally hard-code an initial state
    authState="signIn"
    // Pass in an already authenticated CognitoUser or FederatedUser object
    authData={CognitoUser | 'username'}
    // Fired when Authentication State changes
    onStateChange={(authState) => console.log(authState)}
    // An object referencing federation and/or social providers
    // The federation here means federation with the Cognito Identity Pool Service
    // *** Only supported on React/Web (Not React Native) ***
    // For React Native use the API Auth.federatedSignIn()
    federated={myFederatedConfig}
    // A theme object to override the UI / styling
    theme={myCustomTheme}
    // Hide specific components within the Authenticator
    // *** Only supported on React/Web (Not React Native)  ***
    hide={
        [
            Greetings,
            SignIn,
            ConfirmSignIn,
            RequireNewPassword,
            SignUp,
            ConfirmSignUp,
            VerifyContact,
            ForgotPassword,
            TOTPSetup,
            Loading
        ]
    }
    // or hide all the default components
    hideDefault={true}
    // Pass in an aws-exports configuration
    amplifyConfig={myAWSExports}
    // Pass in a message map for error strings
    errorMessage={myMessageMap}
>
    // Default components can be customized/passed in as child components.
    // Define them here if you used hideDefault={true}
    <Greetings/>
    <SignIn federated={myFederatedConfig}/>
    <ConfirmSignIn/>
    <RequireNewPassword/>
    <SignUp/>
    <ConfirmSignUp/>
    <VerifyContact/>
    <ForgotPassword/>
    <TOTPSetup/>
    <Loading/>
</Authenticator>
Customize your own components
You can provide custom components to the Authenticator as child components in React and React Native.
import { Authenticator, SignIn } from 'aws-amplify-react';

// The override prop tells the Authenticator that the SignUp component is not hidden but overridden
<Authenticator hideDefault={true}>
  <SignIn />
  <MyCustomSignUp override={'SignUp'}/>
</Authenticator>

class MyCustomSignUp extends Component {
  constructor() {
    super();
    this.gotoSignIn = this.gotoSignIn.bind(this);
  }

  gotoSignIn() {
    // to switch the authState to 'signIn'
    this.props.onStateChange('signIn',{});
  }

  render() {
    return (
      <div>
        {/* only render this component when the authState is 'signUp' */}
        { this.props.authState === 'signUp' &&
        <div>
          My Custom SignUp Component
          <button onClick={this.gotoSignIn}>Goto SignIn</button>
        </div>
        }
      </div>
    );
  }
}
You can render the custom component (or not) based on the injected authState within your component as well as jump to other states within your component.
if (props.onStateChange) props.onStateChange(state, data);
To customize the UI for Federated Identities sign-in, you can use withFederated component. The following code shows how you customize the login buttons and the layout for social sign-in.
The withFederated and Federated components are not supported on React Native. Use the API Auth.federatedSignIn() on React Native.
import { withFederated } from 'aws-amplify-react';

const Buttons = (props) => (
    <div>
        <img
            onClick={props.googleSignIn}
            src={google_icon}
        />
        <img
            onClick={props.facebookSignIn}
            src={facebook_icon}
        />
        <img
            onClick={props.amazonSignIn}
            src={amazon_icon}
        />
    </div>
)

const Federated = withFederated(Buttons);

...

const federated = {
    google_client_id: '', // Enter your google_client_id here
    facebook_app_id: '', // Enter your facebook_app_id here
    amazon_client_id: '' // Enter your amazon_client_id here
};

<Federated federated={federated} onStateChange={this.handleAuthStateChange} />
There is also withGoogle, withFacebook, withAmazon components, in case you need to customize a single provider.
Wrapping your Component
This will render your App component with Authenticator:
import { Authenticator } from 'aws-amplify-react'; // or 'aws-amplify-react-native'
...

class AppWithAuth extends Component {
  render(){
    return (
      <div>
      <Authenticator>
        <App />
      </Authenticator>
      </div>
    );
  }
}

export default AppWithAuth;
Show your App After Sign-in
In the previous example, you’ll see the App is rendered even before the user is signed-in. To change this behavior, you can use Authenticator properties. When inside Authenticator, the App component automatically receives those properties.
authState is the current authentication state (a string):
 - signIn
 - signUp
 - confirmSignIn
 - confirmSignUp
 - forgotPassword
 - requireNewPassword
 - verifyContact
 - signedIn
authData - additional data within authState; when the state is signedIn, it will return a CognitoUser object.
Using the options above, to control the condition for Authenticator to render App component, simply set _validAuthStates property:
this._validAuthStates = ['signedIn'];
Then, in the component’s constructor, implement showComponent(theme) {} in lieu of the typical render() {} method.
Social Providers and Federation
Social Provider Setup
Before adding a social provider to an Amplify project, you must first go to that provider and configure an application identifier as outlined below.
Amplify project setup
Once you have the social provider configured, run the following in your project’s root folder:
$ amplify add auth ##"amplify update auth" if already configured
Select Default configuration with Social Provider (Federation):
Do you want to use the default authentication and security configuration?
  Default configuration
❯ Default configuration with Social Provider (Federation)
  Manual configuration
  I want to learn more.
Note: For Sign in Redirect URI(s) inputs, you can put one URI for local development and one for production. Example: http://localhost:3000/ in dev and https://www.example.com/ in production. The same is true for Sign out redirect URI(s).
For React Native applications, You need to define a custom URL scheme for your application before testing locally or publishing to the app store. This is different for Expo or vanilla React Native. Follow the steps at the React Native Linking docs or Expo Linking docs for more information.
After completing those steps, assuming you are using “myapp” as the name of your URL Scheme (or whatever friendly name you have chosen), you will use these URLs as Sign in Redirect URI(s) and/or Sign out redirect URI(s) inputs.
Your URIs could look like any of these:
myapp://exp://127.0.0.1:19000/--/(Local development if your app is running in the Expo client).
Finish Social Setup
After adding your Social provider information into the Amplify project setup, the domain that was created must be added into the Social provider configuration to complete the process.
OAuth and Federation Overview
OAuth 2.0 is the common Authorization framework used by web and mobile applications for getting access to user information (“scopes”) in a limited manner. Common analogies you will hear in OAuth is that of boarding a plane or staying in a hotel - showing your identification is the Authentication piece (signing into an app) and using the boarding pass/hotel key is what you are Authorized to access.
OAuth support in Amplify uses Cognito User Pools and supports federation with social providers, which will automatically create a corresponding user in the User Pool after a login. OIDC tokens are available in the app after the application has completed this process.
OAuth and Hosted UI
After configuring the OAuth endpoints, you can use them or the Hosted UI with Auth.federatedSignIn(). Passing LoginWithAmazon, Facebook, or Google will bypass the Hosted UI and federate immediately with the social provider as shown in the below React example. If you are looking to add a custom state, you are able to do so by passing a string
(e.g. Auth.federatedSignIn({ customState: 'xyz' })) value and listening for the custom state via Hub
import Amplify, { Auth, Hub } from 'aws-amplify';
import awsconfig from './aws_exports';
Amplify.configure(awsconfig);


class App extends Component {
  state = { user: null, customState: null };

  componentDidMount() {
    Hub.listen("auth", ({ payload: { event, data } }) => {
      switch (event) {
        case "signIn":
          this.setState({ user: data });
          break;
        case "signOut":
          this.setState({ user: null });
          break;
        case "customOAuthState":
          this.setState({ customState: data });
      }
    });

    Auth.currentAuthenticatedUser()
      .then(user => this.setState({ user }))
      .catch(() => console.log("Not signed in"));
  }

  render() {
    const { user } = this.state;

    return (
      <div className="App">
        <button onClick={() => Auth.federatedSignIn({provider: 'Facebook'})}>Open Facebook</button>
        <button onClick={() => Auth.federatedSignIn({provider: 'Google'})}>Open Google</button>
        <button onClick={() => Auth.federatedSignIn()}>Open Hosted UI</button>
        <button onClick={() => Auth.signOut()}>Sign Out {user.getUsername()}</button>
      </div>
    );
  }
}
React Components
When using React and React Native, Amplify provides a withOAuth Higher Order Component (HOC) to launch the Hosted UI or bypass and use the social providers directly. The HOCs differ slightly and there are specifics outlined below.
import React, { Component } from 'react';
import { withOAuth } from 'aws-amplify-react';


// inside an async function
// Run this after the sign-in
const federatedInfo = await Cache.getItem('federatedInfo');
const { token } = federatedInfo;
Refreshing JWT Tokens
By default, AWS Amplify will automatically refresh the tokens for Google and Facebook when the app is in the web environment, so that your AWS credentials will be valid at all times. But if you are using another federated provider, or the app is running in React Native, you will need to provide your own token refresh method:
import { Auth } from 'aws-amplify';

function refreshToken() {
    // refresh the token here and get the new token info
    // ......

    return new Promise(res, rej => {
        const data = {
            token, // the token from the provider
            expires_at, // the timestamp for the expiration
            identity_id, // optional, the identityId for the credentials
        }
        res(data);
    });

class MyApp extends Component {
    // ...
    render() {
        return(
            <button onClick={this.props.OAuthSignIn}>
                Sign in with AWS
            </button>
        )
    }
}

export default withOAuth(MyApp);
After being redirected back to your app, you can use the Hub module to detect whether the user is signed in or not.
import Amplify, { Hub } from 'aws-amplify';

// in your redirected sign in page
// when the page is loaded, run the following function
Hub.listen('auth', (data) => {
    switch (data.payload.event) {
        case 'signIn':
            console.log('now the user is signed in');
            const user = data.payload.data;
            break;
        case 'signIn_failure':
            console.log('the user failed to sign in');
            console.log('the error is', data.payload.data);
            break;
        default:
            break;
    }
});
Full React Sample
// OAuthButton.js
import { withOAuth } from 'aws-amplify-react';
import React, { Component } from 'react';

class OAuthButton extends Component {
  render() {
    return (
      <button onClick={this.props.OAuthSignIn}>
        Sign in with AWS
      </button>
    )
  }
}

export default withOAuth(OAuthButton);

// App.js
import React, { Component } from 'react';
import './App.css';
import OAuthButton from './OAuthButton';
import Amplify, { Auth, Hub } from 'aws-amplify';
import awsconfig from './aws-exports'; // your Amplify configuration

// your Cognito Hosted UI configuration
const oauth = {
  domain: 'your_cognito_domain',
  scope: ['phone', 'email', 'profile', 'openid', 'aws.cognito.signin.user.admin'],
  redirectSignIn: 'http://localhost:3000/',
  redirectSignOut: 'http://localhost:3000/',
  responseType: 'code' // or 'token', note that REFRESH token will only be generated when the responseType is code
};

Amplify.configure(awsconfig);
Auth.configure({ oauth });

class App extends Component {
  constructor(props) {
    super(props);
    this.signOut = this.signOut.bind(this);
    // let the Hub module listen on Auth events
    Hub.listen('auth', (data) => {
        switch (data.payload.event) {
            case 'signIn':
                this.setState({authState: 'signedIn', authData: data.payload.data});
                break;
            case 'signIn_failure':
                this.setState({authState: 'signIn', authData: null, authError: data.payload.data});
                break;
            default:
                break;
        }
    });
    this.state = {
      authState: 'loading',
      authData: null,
      authError: null
    }
  }

  componentDidMount() {
    console.log('on component mount');
    // check the current user when the App component is loaded
    Auth.currentAuthenticatedUser().then(user => {
      console.log(user);
      this.setState({authState: 'signedIn'});
    }).catch(e => {
      console.log(e);
      this.setState({authState: 'signIn'});
    });
  }

  signOut() {
    Auth.signOut().then(() => {
      this.setState({authState: 'signIn'});
    }).catch(e => {
      console.log(e);
    });
  }

  render() {
    const { authState } = this.state;
    return (
      <div className="App">
        {authState === 'loading' && (<div>loading...</div>)}
        {authState === 'signIn' && <OAuthButton/>}
        {authState === 'signedIn' && <button onClick={this.signOut}>Sign out</button>}
      </div>
    );
  }
}

export default App;
With React Native, you can use withOAuth HOC to launch the hosted UI experience. Just wrap your app’s main component with our HOC. Doing so, will pass the following props available to your component:
oAuthUser: If the sign was successful, this object will have the user from the user pool.-
oAuthError: In case of an error, the string with the error as given by the Cognito Hosted UI. -
hostedUISignIn: A callback function to trigger the hosted UI sign in flow, this will show the Cognito Hosted UI. signOut: A callback function to trigger the hosted UI sign out flow.
The following props are used for building a custom UI with buttons if you do not want to show the Cognito UI, however it will still create a User Pool entry once the OAuth flow has completed.
facebookSignIn: A callback function to trigger the hosted UI sign in flow for Facebook, this will show the Facebook login page.googleSignIn: A callback function to trigger the hosted UI sign in flow for Google, this will show the Google login page.amazonSignIn: A callback function to trigger the hosted UI sign in flow for LoginWithAmazon, this will show the LoginWithAmazon login page.customProviderSignIn: A callback function to trigger the hosted UI sign in flow for an OIDC provider, this will show the OIDC provider login page. This function expects a string with the provider name specified when adding the OIDC IdP to your User Pool.
To use withOAuth in your React Native application first install the appropriate dependencies:
yarn add aws-amplify-react-native aws-amplify
# npm install aws-amplify-react-native aws-amplify
The following code snippet shows an example of its possible usage:
import React, { Component } from 'react';
import { StyleSheet, Text, ScrollView, SafeAreaView, StatusBar, Button } from 'react-native';
import { default as Amplify } from "aws-amplify";
import { withOAuth } from "aws-amplify-react-native";
import { default as awsConfig } from "./aws-exports";

Amplify.configure(awsConfig);

Amplify.configure({
    Auth: {
        oauth: {
            // OAuth config...
        }
    },
});


class App extends Component {
  render() {
    const {
      oAuthUser: user,
      oAuthError: error,
      hostedUISignIn,
      facebookSignIn,
      googleSignIn,
      amazonSignIn,
      customProviderSignIn,
      signOut,
    } = this.props;

    return (
      <SafeAreaView style={styles.safeArea}>
        {user && <Button title="Sign Out" onPress={signOut} icon='logout' />}
        <ScrollView contentContainerStyle={styles.scrollViewContainer}>
          <Text>{JSON.stringify({ user, error, }, null, 2)}</Text>
          {!user && <React.Fragment>
            {/* Go to the Cognito Hosted UI */}
            <Button title="Cognito" onPress={hostedUISignIn} />

            {/* Go directly to a configured identity provider */}
            <Button title="Facebook" onPress={facebookSignIn} />
            <Button title="Google" onPress={googleSignIn}  />
            <Button title="Amazon" onPress={amazonSignIn} />

            {/* e.g. for OIDC providers */}
            <Button title="Yahoo" onPress={() => customProviderSignIn('Yahoo')} />
          </React.Fragment>}
        </ScrollView>
      </SafeAreaView>
    );
  }
}

const styles = StyleSheet.create({
  safeArea: {
    flexGrow: 1,
    paddingTop: StatusBar.currentHeight,
    backgroundColor: '#FFFFFF',
  },
  scrollViewContainer: {
    flexGrow: 1,
    alignItems: 'center',
    justifyContent: 'center',
  }
});

export default withOAuth(App);
A note for Expo users
It is possible to use Expo’s WebBrowser.openAuthSessionAsync function to launch the hosted UI pages. To do this, you can provide a urlOpener function as below when configuring OAuth in Amplify:
import Amplify from 'aws-amplify';

const urlOpener = async (url, redirectUrl) => {
    // On Expo, use WebBrowser.openAuthSessionAsync to open the Hosted UI pages.
    const { type, url: newUrl } = await WebBrowser.openAuthSessionAsync(url, redirectUrl);

    if (type === 'success') {
        await WebBrowser.dismissBrowser();

        if (Platform.OS === 'ios') {
        return Linking.openURL(newUrl);
        }
    }
};

const oauth = {
    // Domain name
    domain : 'your-domain-prefix.auth.us-east-1.amazoncognito.com',

    // Authorized scopes
    scope : ['phone', 'email', 'profile', 'openid','aws.cognito.signin.user.admin'],

    // Callback URL
    redirectSignIn : 'http://www.example.com/signin/', // or 'exp://127.0.0.1:19000/--/', 'myapp://main/'

    // Sign out URL
    redirectSignOut : 'http://www.example.com/signout/', // or 'exp://127.0.0.1:19000/--/', 'myapp://main/'

    // 'code' for Authorization code grant,
    // 'token' for Implicit grant
    // Note that REFRESH token will only be generated when the responseType is code
    responseType: 'code',

    // optional, for Cognito hosted ui specified options
    options: {
        // Indicates if the data collection is enabled to support Cognito advanced security features. By default, this flag is set to true.
        AdvancedSecurityDataCollectionFlag : true
    },

    urlOpener: urlOpener
}

Amplify.configure({
    Auth: {
        // other configurations...
        // ....
        oauth: oauth
    },
    // ...
});
Identity Pool Federation
You can alternatively use Auth.federatedSignIn() to get AWS credentials directly from Cognito Federated Identities and not use User Pool federation. If you have logged in with Auth.signIn() you can not call Auth.federatedSignIn() as Amplify will perform this federation automatically for you in the background.
In general, if you are using Cognito User Pools to manage user Sign-Up and Sign-In, you should only call Auth.federatedSignIn() when using OAuth flows or the Hosted UI.
import { Auth } from 'aws-amplify';

// To derive necessary data from the provider
const {
    token, // the token you get from the provider
    domainOrProviderName, // Either the domain of the provider(e.g. accounts.your-openid-provider.com) or the provider name, for now the library only supports 'google', 'facebook', 'amazon', 'developer'
    expiresIn, // the time in ms which describes how long the token could live
    user,  // the user object you defined, e.g. { username, email, phone_number }
    identity_id // Optional, the identity id specified by the provider
} = getFromProvider(); // arbitrary funcion

Auth.federatedSignIn(
    domain,
    {
        token,
        identity_id, // Optional
        expires_at: expiresIn * 1000 + new Date().getTime() // the expiration timestamp
    },
    user
).then(cred => {
    // If success, you will get the AWS credentials
    console.log(cred);
    return Auth.currentAuthenticatedUser();
}).then(user => {
    // If success, the user object you passed in Auth.federatedSignIn
    console.log(user);
}).catch(e => {
    console.log(e)
});
Note that this isn’t from a Cognito User Pool so the user you get after calling this method is not a Cognito User.
Code Samples
Facebook React Sample
import React, { Component } from 'react';
import { Auth } from 'aws-amplify';
// To federated sign in from Facebook
class SignInWithFacebook extends Component {
    constructor(props) {
        super(props);
        this.signIn = this.signIn.bind(this);
    }

    componentDidMount() {
        if (!window.FB) this.createScript();
    }

    signIn() {
        const fb = window.FB;
        fb.getLoginStatus(response => {
            if (response.status === 'connected') {
                this.getAWSCredentials(response.authResponse);
            } else {
                fb.login(
                    response => {
                        if (!response || !response.authResponse) {
                            return;
                        }
                        this.getAWSCredentials(response.authResponse);
                    },
                    {
                        // the authorized scopes
                        scope: 'public_profile,email'
                    }
                );
            }
        });
    }

    getAWSCredentials(response) {
            const { accessToken, expiresIn } = response;
            const date = new Date();
            const expires_at = expiresIn * 1000 + date.getTime();
            if (!accessToken) {
                return;
            }

            const fb = window.FB;
            fb.api('/me', { fields: 'name,email' }, response => {
                const user = {
                    name: response.name,
                    email: response.email
                };

                Auth.federatedSignIn('facebook', { token: accessToken, expires_at }, user)
                .then(credentials => {
                    console.log(credentials);
                });
            });
        }

    createScript() {
        // load the sdk
        window.fbAsyncInit = this.fbAsyncInit;
        const script = document.createElement('script');
        script.src = 'https://connect.facebook.net/en_US/sdk.js';
        script.async = true;
        script.onload = this.initFB;
        document.body.appendChild(script);
    }

    initFB() {
        const fb = window.FB;
        console.log('FB SDK inited');
    }

    fbAsyncInit() {
        // init the fb sdk client
        const fb = window.FB;
        fb.init({
            appId   : 'your_facebook_app_id',
            cookie  : true,
            xfbml   : true,
            version : 'v2.11'
        });
    }

    render() {
        return (
            <div>
                <button onClick={this.signIn}>Sign in with Facebook</button>
            </div>
        );
    }
}
Google Sample in React
import React, { Component } from 'react';
import { Auth } from 'aws-amplify';
// To federated sign in from Google
class SignInWithGoogle extends Component {
    constructor(props) {
        super(props);
        this.signIn = this.signIn.bind(this);
    }

    componentDidMount() {
        const ga = window.gapi && window.gapi.auth2 ?
            window.gapi.auth2.getAuthInstance() :
            null;
        if (!ga) this.createScript();
    }

    signIn() {
        const ga = window.gapi.auth2.getAuthInstance();
        ga.signIn().then(
            googleUser => {
                this.getAWSCredentials(googleUser);
            },
            error => {
                console.log(error);
            }
        );
    }

    async getAWSCredentials(googleUser) {
        const { id_token, expires_at } = googleUser.getAuthResponse();
        const profile = googleUser.getBasicProfile();
        let user = {
            email: profile.getEmail(),
            name: profile.getName()
        };

        const credentials = await Auth.federatedSignIn(
            'google',
            { token: id_token, expires_at },
            user
        );
        console.log('credentials', credentials);
    }

    createScript() {
        // load the Google SDK
        const script = document.createElement('script');
        script.src = 'https://apis.google.com/js/platform.js';
        script.async = true;
        script.onload = this.initGapi;
        document.body.appendChild(script);
    }

    initGapi() {
        // init the Google SDK client
        const g = window.gapi;
        g.load('auth2', function() {
            g.auth2.init({
                client_id: 'your_google_client_id',
                // authorized scopes
                scope: 'profile email openid'
            });
        });
    }

    render() {
        return (
            <div>
                <button onClick={this.signIn}>Sign in with Google</button>
            </div>
        );
    }
}
Facebook Example in React Native, Expo
import Expo from 'expo';
import React, { Component } from 'react';
import Amplify, { Auth } from 'aws-amplify';

export default class App extends Component {
  async signIn() {
    const { type, token, expires } = await Expo.Facebook.logInWithReadPermissionsAsync('YOUR_FACEBOOK_APP_ID', {
        permissions: ['public_profile'],
      });
    if (type === 'success') {
      // sign in with federated identity
      Auth.federatedSignIn('facebook', { token, expires_at: expires}, { name: 'USER_NAME' })
        .then(credentials => {
          console.log('get aws credentials', credentials);
        }).catch(e => {
          console.log(e);
        });
    }
  }

  // ...

  render() {
    return (
      <View style={styles.container}>
        <Button title="FBSignIn" onPress={this.signIn.bind(this)} />
      </View>
    );
  }
}
Retrieve JWT Tokens
After the federated login, you can retrieve related JWT tokens from the local cache using the Cache module:
Browser sample
import { Cache } from 'aws-amplify';

// Run this after the sign-in
const federatedInfo = Cache.getItem('federatedInfo');
const { token } = federatedInfo;
React Native sample
import { Cache } from 'aws-amplify';

// inside an async function
// Run this after the sign-in
const federatedInfo = await Cache.getItem('federatedInfo');
const { token } = federatedInfo;
Token Refresh
By default, Amplify will automatically refresh the tokens for Google and Facebook, so that your AWS credentials will be valid at all times. But if you are using another federated provider, you will need to provide your own token refresh method:
JWT Token Refresh sample
import { Auth } from 'aws-amplify';

function refreshToken() {
    // refresh the token here and get the new token info
    // ......

    return new Promise(res, rej => {
        const data = {
            token, // the token from the provider
            expires_at, // the timestamp for the expiration
            identity_id, // optional, the identityId for the credentials
        }
        res(data);
    });
}

Auth.configure({
    refreshHandlers: {
        'developer': refreshToken // the property could be 'google', 'facebook', 'amazon', 'developer', OpenId domain
    }
})
Using Components from aws-amplify-react
To enable social sign-in in your app with Identity Pools, add Google client_id, Facebook app_id and/or Amazon client_id properties to Authenticator component. This will create a sign in button when rendering the Authenticator in your app.
import { Authenticator } from 'aws-amplify-react/dist/Auth';

const federated = {
    google_client_id: '',
    facebook_app_id: '',
    amazon_client_id: ''
};

return (
    <Authenticator federated={federated}>
)
Or you can use it with withAuthenticator:
const AppWithAuth = withAuthenticator(App);

const federated = {
    google_client_id: '', // Enter your google_client_id here
    facebook_app_id: '', // Enter your facebook_app_id here
    amazon_client_id: '' // Enter your amazon_client_id here
};

ReactDOM.render(<AppWithAuth federated={federated}/>, document.getElementById('root'));
Federated with Auth0
You can use Auth0 as one of the providers of your Cognito Identity Pool. This will allow users authenticated via Auth0 have access to your AWS resources.
Step 1. Follow Auth0 integration instructions for Cognito Federated Identity Pools
Step 2. Login with Auth0, then use the id token returned to get AWS credentials from Cognito Federated Identity Pools using Auth.federatedSignIn:
const { idToken, domain, name, email, phoneNumber } = getFromAuth0(); // get the user credentials and info from auth0
const { exp } = decodeJWTToken(idToken); // Please decode the id token in order to get the expiration time

Auth.federatedSignIn(
    domain, // The Auth0 Domain,
    {
        token: idToken, // The id token from Auth0
        // expires_at means the timestamp when the token provided expires,
        // here we can derive it from the expiresIn parameter provided,
        // then convert its unit from second to millisecond, and add the current timestamp
        expires_at: exp * 1000 // the expiration timestamp
    },
    {
        // the user object, you can put whatever property you get from the Auth0
        // for exmaple:
        name, // the user name
        email, // Optional, the email address
        phoneNumber, // Optional, the phone number
    }
).then(cred => {
    console.log(cred);
});
Step 3. Get the current user and current Credentials:
Auth.currentAuthenticatedUser().then(user => console.log(user));
Auth.currentCredentials().then(creds => console.log(creds));
// Auth.currentSession() does not currently support federated identities. Please store the auth0 session info manually(for exmaple, store tokens into the local storage).
Step 4. You can pass a refresh handler to the Auth module to refresh the id token from Auth0:
function refreshToken() {
    // refresh the token here and get the new token info
    // ......

    return new Promise(res, rej => {
        const data = {
            token, // the token from the provider
            expires_at, // the timestamp when the token expires (in milliseconds)
            identity_id, // optional, the identityId for the credentials
        }
        res(data);
    });
}

Auth.configure({
    refreshHandlers: {
        'your_auth0_domain': refreshToken
    }
})
This feature is also integrated into aws-amplify-react:
import { withAuthenticator } from 'aws-amplify-react';
import { Auth } from 'aws-amplify';

// auth0 configuration, more info in: https://auth0.com/docs/libraries/auth0js/v9#available-parameters
Auth.configure({
    auth0: {
        domain: 'your auth0 domain',
        clientID: 'your client id',
        redirectUri: 'your call back url',
        audience: 'https://your_domain/userinfo',
        responseType: 'token id_token', // for now we only support implicit grant flow
        scope: 'openid profile email', // the scope used by your app
        returnTo: 'your sign out url'
    }
});

class App extends Component { //... }

export default withAuthenticator(App);
Note: The code grant flow is not supported when using Auth0 with aws-amplify-react per Auth0 documentation.
Alternatively you can use the withAuth0 HOC:
import { withAuth0 } from 'aws-amplify-react';
import { Auth } from 'aws-amplify';

Auth.configure({
    auth0: {
        domain: 'your auth0 domain',
        clientID: 'your client id',
        redirectUri: 'your call back url',
        audience: 'https://your_domain/userinfo',
        responseType: 'token id_token', // for now we only support implicit grant flow
        scope: 'openid profile email', // the scope used by your app
        returnTo: 'your sign out url'
    }
});

const Button = (props) => (
    <div>
        <img
            onClick={props.auth0SignIn}
            src={auth0_icon}
        />
    </div>
);

export default withAuth0(Button);
Enabling MFA
MFA (Multi-factor authentication increases security for your app by adding an authentication method and not relying solely on the username (or alias) and password. AWS Amplify uses Amazon Cognito to provide MFA. Please see Amazon Cognito Developer Guide for more information about setting up MFA in Amazon Cognito.
Once you enable MFA on Amazon Cognito, you can configure your app to work with MFA.
Enabling TOTP
With TOTP (Time-based One-time Password), your app user is challenged to complete authentication using a time-based one-time (TOTP) password after their username and password have been verified.
You can setup TOTP for a user in your app:
import { Auth } from 'aws-amplify';

// To setup TOTP, first you need to get a `authorization code` from Amazon Cognito
// `user` is the current Authenticated user
Auth.setupTOTP(user).then((code) => {
    // You can directly display the `code` to the user or convert it to a QR code to be scanned.
    // E.g., use following code sample to render a QR code with `qrcode.react` component:
    //      import QRCode from 'qrcode.react';
    //      const str = "otpauth://totp/AWSCognito:"+ username + "?secret=" + code + "&issuer=" + issuer;
    //      <QRCode value={str}/>
});

// ...

// Then you will have your TOTP account in your TOTP-generating app (like Google Authenticator)
// Use the generated one-time password to verify the setup
Auth.verifyTotpToken(user, challengeAnswer).then(() => {

    // don't forget to set TOTP as the preferred MFA method
    Auth.setPreferredMFA(user, 'TOTP');
    // ...
}).catch( e => {
    // Token is not verified
});
Setup MFA Type
Multiple MFA types supported by Amazon Cognito. You can set the preferred method in your code:
import { Auth } from 'aws-amplify';

// You can select preferred mfa type, for example:
// Select TOTP as preferred
Auth.setPreferredMFA(user, 'TOTP').then((data) => {
    console.log(data);
    // ...
}).catch(e => {});

// Select SMS as preferred
Auth.setPreferredMFA(user, 'SMS');

// Select no-mfa
Auth.setPreferredMFA(user, 'NOMFA');
Retrieving Current Preferred MFA Type
You can get current preferred MFA type in your code:
import { Auth } from 'aws-amplify';

// Will retrieve the current mfa type from cache
Auth.getPreferredMFA(user,{
    // Optional, by default is false.
    // If set to true, it will get the MFA type from server side instead of from local cache.
    bypassCache: false
}).then((data) => {
    console.log('Current prefered MFA type is: ' + data);
})
Letting User Select MFA Type
When working with multiple MFA Types, you can let the app user select the desired authentication method. SelectMFAType UI Component, which is provided with aws-amplify-react package, renders a list of available MFA types.
import Amplify from 'aws-amplify';
import awsconfig from './aws-exports';
import { SelectMFAType } from 'aws-amplify-react';

Amplify.configure(awsconfig);

// Please have at least TWO types
// Please make sure you set it properly according to your Cognito User pool
const MFATypes = {
    SMS: true, // if SMS enabled in your user pool
    TOTP: true, // if TOTP enabled in your user pool
    Optional: true, // if MFA is set to optional in your user pool
}

class App extends Component {
    // ...
    render() {
        return (
            // ...
            <SelectMFAType authData={this.props.authData} MFATypes={MFATypes}>
        )
    }
}

export default withAuthenticator(App, true);
Working with User Attributes
You can pass user attributes during sign up:
Auth.signUp({
    'username': 'jdoe',
    'password': 'mysecurerandompassword#123',
    'attributes': {
        'email': 'me@domain.com',
        'phone_number': '+12128601234', // E.164 number convention
        'given_name': 'Jane',
        'family_name': 'Doe',
        'nickname': 'Jane'
    }
});
You can retrieve user attributes:
let user = await Auth.currentAuthenticatedUser();

const { attributes } = user;
You can update user attributes:
let user = await Auth.currentAuthenticatedUser();

let result = await Auth.updateUserAttributes(user, {
    'email': 'me@anotherdomain.com',
    'family_name': 'Lastname'
});
console.log(result); // SUCCESS
You can find a list of all custom attributes here.
If you change the email address, the user will receive a confirmation code. In your app, you can confirm the verification code:
let result = await Auth.verifyCurrentUserAttributeSubmit('email', 'abc123');
Subscribing Events
You can take specific actions when users sign-in or sign-out by subscribing authentication events in your app. Please see our Hub Module Developer Guide for more information.
Working with AWS Service Objects
You can use AWS Service Interface Objects to work AWS Services in authenticated State. You can call methods on any AWS Service interface object by passing your credentials from Auth object to the service call constructor:
import Route53 from 'aws-sdk/clients/route53';

Auth.currentCredentials()
  .then(credentials => {
    const route53 = new Route53({
      apiVersion: '2013-04-01',
      credentials: Auth.essentialCredentials(credentials)
    });

    // more code working with route53 object
    // route53.changeResourceRecordSets();
  })
Full API Documentation for Service Interface Objects is available here.
Note: To work with Service Interface Objects, your Amazon Cognito users’ IAM role must have the appropriate permissions to call the requested services.
API Reference
For the complete API documentation for Authentication module, visit our API Reference
Switching Authentication Flow Type
For client side authentication there are three different flows:
-
USER_SRP_AUTH: TheUSER_SRP_AUTHflow uses the SRP protocol (Secure Remote Password) where the password never leaves the client and is unknown to the server. This is the recommended flow and is used by default. -
USER_PASSWORD_AUTH: TheUSER_PASSWORD_AUTHflow will send user credentials unencrypted to the back-end. If you want to migrate users to Cognito using the “Migration” trigger and avoid forcing users to reset their passwords, you will need to use this authentication type because the Lambda function invoked by the trigger needs to verify the supplied credentials. -
CUSTOM_AUTH: TheCUSTOM_AUTHflow is used to allow for a series of challenge and response cycles that can be customized to meet different requirements.
For more information about authentication flows, please visit AWS Cognito developer documentation
To configure Auth to use the different flows:
Auth.configure({
    // other configurations...
    // ...
    authenticationFlowType: 'USER_SRP_AUTH' | 'USER_PASSWORD_AUTH' | 'CUSTOM_AUTH',
})
User Password Authentication Flow
App Client Setup
In order to use the authentication flow USER_PASSWORD_AUTH, your Cognito app client has to be configured to allow it. In the AWS Console, this is done by ticking the checkbox at General settings > App clients > Show Details (for the affected client) > Enable username-password (non-SRP) flow. If you’re using the AWS CLI or CloudFormation, update your app client by adding USER_PASSWORD_AUTH to the list of “Explicit Auth Flows”.
Migrating Users to AWS Cognito
A use case for this authentication flow is migrating users into Amazon Cognito.
Amazon Cognito provides a trigger to migrate users from your existing user directory seamlessly into Cognito. You achieve this by configuring your User Pool’s “Migration” trigger which invokes a Lambda function whenever a user that does not already exist in the user pool authenticates, or resets their password.
In short, the Lambda function will validate the user credentials against your existing user directory and return a response object containing the user attributes and status on success. An error message will be returned if an error occurs. There’s a documentation here on how to set up this migration flow and more detailed instructions here on how the lambda should handle request and response objects.
Customizing Authentication Flow
Amazon Cognito User Pools supports customizing the authentication flow to enable custom challenge types, in addition to a password in order to verify the identity of users. These challenge types may include CAPTCHAs or dynamic challenge questions.
To define your challenges for custom authentication flow, you need to implement three Lambda triggers for Amazon Cognito.
For more information about working with Lambda Triggers for custom authentication challenges, please visit Amazon Cognito Developer Documentation.
Custom Authentication in Amplify
To initiate a custom authentication flow in your app, call signIn without a password. A custom challenge needs to be answered using the sendCustomChallengeAnswer method:
import { Auth } from 'aws-amplify';

Auth.configure({
    // other configurations
    // ...
    authenticationFlowType: 'CUSTOM_AUTH'
});

let challengeResponse = "the answer for the challenge";

Auth.signIn(username, password)
    .then(user => {
        if (user.challengeName === 'CUSTOM_CHALLENGE') {
            // to send the answer of the custom challenge
            Auth.sendCustomChallengeAnswer(user, challengeResponse)
                .then(user => console.log(user))
                .catch(err => console.log(err));
        } else {
            console.log(user);
        }
    })
    .catch(err => console.log(err));
Creating a CAPTCHA
Here is the sample for creating a CAPTCHA challenge with a Lambda Trigger.
The Create Auth Challenge Lambda Trigger creates a CAPTCHA as a challenge to the user. The URL for the CAPTCHA image and the expected answer is added to the private challenge parameters:
export const handler = async (event) => {
    if (!event.request.session || event.request.session.length === 0) {
        event.response.publicChallengeParameters = {
            captchaUrl: "url/123.jpg",
        };
        event.response.privateChallengeParameters = {
            answer: "5",
        };
        event.response.challengeMetadata = "CAPTCHA_CHALLENGE";
    }
    return event;
};
This Define Auth Challenge Lambda Trigger defines a custom challenge:
export const handler = async (event) => {
    if (!event.request.session || event.request.session.length === 0) {
        // If we don't have a session or it is empty then send a CUSTOM_CHALLENGE
        event.response.challengeName = "CUSTOM_CHALLENGE";
        event.response.failAuthentication = false;
        event.response.issueTokens = false;
    } else if (event.request.session.length === 1 && event.request.session[0].challengeResult === true) {
        // If we passed the CUSTOM_CHALLENGE then issue token
        event.response.failAuthentication = false;
        event.response.issueTokens = true;
    } else {
        // Something is wrong. Fail authentication
        event.response.failAuthentication = true;
        event.response.issueTokens = false;
    }

    return event;
};
The Verify Auth Challenge Response Lambda Trigger is used to verify a challenge answer:
export const handler = async (event, context) => {
    if (event.request.privateChallengeParameters.answer === event.request.challengeAnswer) {
        event.response.answerCorrect = true;
    } else {
        event.response.answerCorrect = false;
    }

    return event;
};
Customization
Customize UI Theme
For React, you can create your own theme and use it to render Amplify components:
Your custom theme must use the selectors from the following template
import MyTheme from './MyTheme';

<Authenticator theme={MyTheme} />
Alternatively, you can change a few properties and pass in a theme object from the same file:
const MyTheme = {
    signInButtonIcon: { 'display': 'none' },
    googleSignInButton: { 'backgroundColor': 'red', 'borderColor': 'red' }
}

<Authenticator theme={MyTheme} />
For React Native, you must override properties defined in AmplifyTheme.js here
import { AmplifyTheme } from 'aws-amplify-react-native';

const MySectionHeader = Object.assign({}, AmplifyTheme.sectionHeader, { background: 'orange' });
const MyTheme = Object.assign({}, AmplifyTheme, { sectionHeader: MySectionHeader });

<Authenticator theme={MyTheme} />
Create Your Own UI
To customize the default auth experience even more, you can create your own auth UI. To do this, your component will leverage the following Authenticator properties:
- authState
- authData
- onStateChange
The following example creates an ‘Always On’ Auth UI, which continuously shows the current auth state in your app.
import { Authenticator, SignIn, SignUp, ConfirmSignUp, Greetings } from 'aws-amplify-react';

const AlwaysOn = (props) => {
    return (
        <div>
            <div>I am always here to show current auth state: {props.authState}</div>
            <button onClick={() => props.onStateChange('signUp')}>Show Sign Up</button>
        </div>
    )
}

handleAuthStateChange(state) {
    if (state === 'signedIn') {
        /* Do something when the user has signed-in */
    }
}

render() {
    return (
        <Authenticator hideDefault={true} onStateChange={this.handleAuthStateChange}>
            <SignIn/>
            <SignUp/>
            <ConfirmSignUp/>
            <Greetings/>
            <AlwaysOn/>
        </Authenticator>
    )
}
Composing Your Own Authenticator
Authenticator is designed as a container for a number of Auth components. Each component does a single job, e.g., SignIn, SignUp, etc. By default, all of these elements are visible depending on the authentication state.
If you want to replace some or all of the Authenticator elements, you need to set hideDefault={true}, so the component doesn’t render its default view. Then you can pass in your own set of child components that listen to authState and decide what to do.
You can also pass the child components you want to use. For example, the following Authenticator configuration only renders Greetings component which has a Sign Out button:
<Authenticator hideDefault={true}>
    <Greetings />
</Authenticator>
Customize Greeting message
The Greetings component has two states: signedIn, and signedOut. To customize the greeting message, set properties inGreeting and outGreeting using a string or function.
<Authenticator hideDefault={true}>
    <Greetings
        inGreeting={(username) => 'Hello ' + username}
        outGreeting="Please sign in..."
    />
</Authenticator>
Customize withAuthenticator
The withAuthenticator HOC gives you some nice default authentication screens out-of-box. If you want to use your own components rather than provided default components, you can pass the list of customized components to withAuthenticator:
import React, { Component } from 'react';
import { ConfirmSignIn, ConfirmSignUp, ForgotPassword, RequireNewPassword, SignIn, SignUp, VerifyContact, withAuthenticator } from 'aws-amplify-react';

class App extends Component {
  render() {
    ...
  }
}

// This is my custom Sign in component
class MySignIn extends SignIn {
  render() {
    ...
  }
}

export default withAuthenticator(App, false, [
  <MySignIn/>,
  <ConfirmSignIn/>,
  <VerifyContact/>,
  <SignUp/>,
  <ConfirmSignUp/>,
  <ForgotPassword/>,
  <RequireNewPassword />
]);
If you would like to add custom styling to the UI components you can pass a custom theme object as a parameter to the withAuthenticator HOC using the instructions above:
export default withAuthenticator(App, false, [], null, MyTheme);
Customize Error Messages
During authentication flows, Amplify handles error messages returned from the server. Amplify provides a simple way of customizing those error messages with a messageMap callback.
The function takes the original message as arguments and then outputs the desired message. Check AmplifyMessageMap.js file to see how Amplify makes the map function.
const map = (message) => {
    if (/incorrect.*username.*password/i.test(message)) {
        return 'Incorrect username or password';
    }

    return message;
}

<Authenticator errorMessage={map} />
You may notice in AmplifyMessageMap.js it also handles internationalization. This topic is covered in our I18n Guide.
Customize Text Labels
You can change the text for the labels (like ‘Sign In’ and ‘Sign Up’) on the built-in user interface by providing your own dictionary to the localization engine:
import { I18n } from 'aws-amplify';

const authScreenLabels = {
    en: {
        'Sign Up': 'Create new account',
        'Sign Up Account': 'Create a new account'
    }
};

I18n.setLanguage('en');
I18n.putVocabularies(authScreenLabels);
Customize Initial authState
You can change the initial auth state for your Authenticator. By default the initial state is signIn which will shows the signIn component.
If you want the signUp component shows first, you can do:
<Authenticator authState='signUp'>
Using Modular Imports
If you only need to use Auth, you can do: npm install @aws-amplify/auth which will only install the Auth module for you.
Then in your code, you can import the Auth module by:
import Auth from '@aws-amplify/auth';

Auth.configure();