

DataStore
Amplify DataStore provides a persistent on-device storage repository for you to write, read, and observe changes to data if you are online or offline, and seamlessly sync to the cloud as well as across devices. Data modeling for your application is using GraphQL and converted to Models that are used in JavaScript, iOS, or Android applications. You can use DataStore for your offline use cases in a “local only” mode without an AWS account or provision an entire backend using AWS AppSync and Amazon DynamoDB. DataStore includes Delta Sync using your GraphQL backend and several conflict resolution strategies.
Getting Started
Model Generation
Modeling your data and generating models which are used by DataStore is the first step to get started. GraphQL is used as a common language across JavaScript, iOS, and Android for this process, and is also used as the network protocol when syncing with the cloud. GraphQL is also what powers some of the features such as Automerge in AppSync. Model generation can be done via an NPX script or from the command line with the Amplify CLI.
Using NPX
The fastest way to get started is using the amplify-app npx script.
For Web:
Such as with Create React app:
npx create-react-app amplify-datastore --use-npm
cd amplify-datastore
npx amplify-app@latest
For React Native:
Such as with the React Native CLI:
npx react-native init AmplifyDatastoreRN
cd AmplifyDatastoreRN
npx amplify-app@latest
Once this completes open the GraphQL schema in the amplify/backend/api/<datasourcename>/schema.graphql. You can use the sample or the one below that will be used in this documentation:
enum PostStatus {
  ACTIVE
  INACTIVE
}

type Post @model {
  id: ID!
  title: String!
  rating: Int!
  status: PostStatus!
}
After saving the file press Enter in your terminal and run npm run amplify-modelgen.
You do not need an AWS account to run this and use DataStore locally, however if you wish to sync with the cloud it is recommended you Install and configure the Amplify CLI
Manual Model Generation
If you do not wish to use the above NPX script you can do this manually by first installing the Amplify CLI:
npm i -g @aws-amplify/cli@latest
The Amplify CLI can generate models at any time with the following command:
amplify codegen models
Schema updates
When a schema changes and Model generation re-runs, it will evaluate the changes and create a versioned hash if any changes are detected which impact the underlying on-device storage structure. For example types being added/deleted or fields becoming required/optional. DataStore evaluates this version on startup and if there are changes the local items on device will be removed and a full sync from AppSync will take place if you are syncing with the cloud. Local migrations on device are not supported. If you are syncing with the cloud the structure and items of that data in your DynamoDB table will not be touched as part of this process.
Setup
Install dependencies:
npm i @aws-amplify/core @aws-amplify/datastore
React Native specific steps:
For this step, there are different instructions for Expo apps vs React Native CLI based apps. Follow the steps that are relevant for your setup:
For Expo Managed Apps:
Install NetInfo with expo
expo install @react-native-community/netinfo
That is all for Expo managed apps. Move directly to the next step
For Apps created with React Native CLI:
Install NetInfo through npm
npm install @react-native-community/netinfo
If using React Native > 0.60, run the following command for iOS:
cd ios && pod install && cd ..
If you are using React Native <0.60 and need to link manually, refer to the react-native-community/netinfo getting started guide
Import generated models
In addition to importing Amplify, DataStore, and Predicates into your application you must also import the generated Models. They will be named imports from the ./models directory which match up to any GraphQL type or enum definitions from your schema:
import Amplify from "@aws-amplify/core";
import { DataStore, Predicates } from "@aws-amplify/datastore";
import { Post, PostStatus } from "./models";
Save Data
To write any data to the DataStore you can pass an instance of a Model to DataStore.save() and it will be persisted in offline storage. At this point you can use it as an item in a normal data store such as querying, updating or deleting. If you choose to later connect to the cloud the item will be synchronized using GraphQL mutations and any other systems connected to the same backend can run queries or mutations on these items as well as observe them with GraphQL subscriptions.
await DataStore.save(
    new Post({
      title: `My First Post`,
      rating: 10,
      status: PostStatus.ACTIVE
    })
  );
Query Data
Querying data is always against the locally synchronized data, which is updated in the background for you by the DataStore Sync Engine when connected to the cloud. You can query using models as well as conditions using predicate filters for finer grained results.
const posts = await DataStore.query(Post);
This will return a list of the first 100 items, you can optionally pass in a limit and page:
const posts = await DataStore.query(Post, Predicates.ALL, {
  page: 0,
  limit: 100
});
The second object is a condition, described in the next section. The page and limit are optional.
Query with Predicates
You can apply predicate filters against the DataStore using the fields defined on your GraphQL type along with the following conditions supported by DynamoDB:
Strings: eq | ne | le | lt | ge | gt | contains | notContains | beginsWith | between
Numbers: eq | ne | le | lt | ge | gt | between
Lists: contains | notContains
For example if you wanted a list of all “Post” Models that have a “rating” greater than 4:
const posts = await DataStore.query(Post, c => c.rating("gt", 4));
When using multiple conditions, there is an implicit AND defined to mirror the GraphQL Transform condition statements. For example with multiple conditions:
const posts = await DataStore.query(Post, c => c.rating("gt", 4).status("eq", PostStatus.ACTIVE));
If you wanted this to be an OR statement you would wrap your combined predicates with c => c.or(...)
const posts = await DataStore.query(Post, c => c.or(
  c => c.rating("gt", 4).status("eq", PostStatus.ACTIVE)
));
Update Data
Models in DataStore are immutable. To update a record you must use the .copyOf function to apply updates to the item’s fields rather than mutating the instance directly:
const original = await DataStore.query(Post, "123");

await DataStore.save(
	Post.copyOf(original, updated => {
		updated.title = `title ${Date.now()}`;
		updated.status =
			updated.status === PostStatus.ACTIVE
				? PostStatus.INACTIVE
				: PostStatus.ACTIVE;
	})
);
You can also apply conditions to update and delete operations. The condition will be applied locally and if you have enabled synchronization with the cloud it will be placed in a network mutation queue. The GraphQL mutation will then include this condition and be evaluated against the existing record in DynamoDB. If the condition holds the item in the cloud is updated and synchronized across devices. If the check fails then the item is not updated and the source of truth from the cloud will be applied to the local DataStore. For instance if you wanted to update if the rating was greater than 3:
const original = await DataStore.query(Post, "123");

await DataStore.save(
	Post.copyOf(original, updated => {
		updated.title = `title ${Date.now()}`;
		updated.status =
			updated.status === PostStatus.ACTIVE
				? PostStatus.INACTIVE
				: PostStatus.ACTIVE;
  }),
  c => c.rating("gt", 3)
);
Conditional updates can only be applied to single items and not lists. If you wish to update a list of items you can loop over them and apply conditions one at a time.
Delete Data
To delete an item simply pass in an instance:
const todelete = await DataStore.query(Post, "1234567");
DataStore.delete(todelete);
You can also pass predicate operators to delete multiple items. For example will delete all inactive posts:
await DataStore.delete(Post, c => c.status("eq", PostStatus.INACTIVE));
Additionally you can perform a conditional delete, for instance only delete if a post is inactive by passing in an instance of a model:
const todelete = await DataStore.query(Post, "123");
DataStore.delete(todelete, c => c.status("eq", PostStatus.INACTIVE));
Also to delete all items for a model you can use Predicates.ALL:
await DataStore.delete(Post, Predicates.ALL);
Observe Data
You can subscribe to changes on your Models by using observe in the DataStore API. This reacts dynamically to updates of data to the underlying Storage Engine, which could be the result of GraphQL Subscriptions as well as Queries or Mutations that run against the backing AppSync API if you are synchronizing with the cloud.
Note: observe is async however you should not put await in front of it like the other DataStore API methods.
const subscription = DataStore.observe(Post).subscribe(msg => {
  console.log(msg.model, msg.opType, msg.element);
});
Sync with the cloud
Once you’re happy with your application, you can start syncing with the cloud by provisioning a backend from your project. This can be done using the amplify-app npx script by running npm run amplify-push, or with the Amplify CLI by running amplify push directly. Provisioning will also create a project in the AWS Amplify Console to store metadata (such as the GraphQL schema) which you can pull down to generate models on other platforms.
DataStore can connect to an existing AppSync backend that has been deployed from another JavaScript project or even it was originally deployed by iOS or Android. In these workflows it is best to work with the CLI directly by running an amplify pull command from your terminal and then generating models, either using npm run amplify-modelgen from the NPX script or with amplify codegen models using the Amplify CLI.
For more information on this workflow please see the Multiple Frontends documentation.
If you do not already have a local AWS profile with credentials you can automatically setup with the Amplify CLI by running amplify configure
Use NPM
npm run amplify-push
Use Amplify CLI
amplify push
Connect your app
Once the push finishes an aws-exports.js file will be created in your project which you can import and configure your project:
import awsconfig from "./aws-exports";
Amplify.configure(awsconfig);
Once configured, restart your app and it will connect with your backend using GraphQL queries, mutations, and subscriptions.
Relational Models
DataStore has the capability to handle relationships between Models, such as Has One, Has Many, Belongs To, and Many To Many. In GraphQL this is done with @connection as defined in the GraphQL Transformer documentation. For the examples below with DataStore use the following schema:
enum PostStatus {
  ACTIVE
  INACTIVE
}

type Post @model {
  id: ID!
  title: String!
  comments: [Comment] @connection(name: "PostComments")
  rating: Int!
  status: PostStatus!
}
type Comment @model {
  id: ID!
  content: String
  post: Post @connection(name: "PostComments")
}
Saving relations
In order to save connected models you will create an instance of the model you wish to connect and pass it to DataStore.save with the parent as an argument (post in the below example):
const post =  await DataStore.save(
    new Post({
      title: `My Post with comments`,
      rating: 10,
      status: PostStatus.ACTIVE
    })
  );

await DataStore.save(
  new Comment({
    content: "Loving Amplify DataStore!",
    post
  })
);
The above example shows how to use a one-to-many schema and save connected models. For many-to-many relations, such as the one shows in the GraphQL Transformer examples you would do something like the following:
const post =  await DataStore.save(
  new Post({
    title: `My first post`,
  })
);

const editor =  await DataStore.save(
  new User({
    username: `Nadia`,
  })
);

await DataStore.save(
  new PostEditor({
    post,
    editor
  })
);
In this case, you save instances of models from each side of the relationship and then join them together in the connecting type on a field defined with @connection. For the schema above this corresponds to post: Post! @connection(fields: ["postID"]) and editor: User! @connection(fields: ["editorID"]).
Querying relations
const comments = (await DataStore.query(Comment)).filter(c => c.post.id === "123");
Alternatively:
const post = await DataStore.query(Post, "123");
const comments = (await DataStore.query(Comment)).filter(c => c.post.id === post.id);
Observing relations
const subscription = DataStore.observe(Comment)
  .subscribe(msg => {
    if(c.post.id === "123") {
      console.log(msg.model, msg.opType, msg.element);
    }
  });
Deleting relations
When you delete a parent object in a one to many relationship, the children will also be removed from the DataStore and mutations for this deletion will be sent over the network. For example the following operation would remove the Post with id 123 as well as any related comments:
const todelete = await DataStore.query(Post, "123");
DataStore.delete(todelete);
However, in a many to many relationship the children are not removed and you must explicitly delete them.
Config
DataStore has a few optional configurations, such as the ability to specify a custom handler for error messages that take place in any part of the system. You can also specify a custom conflict handler that runs if a mutation is rejected by AWS AppSync during one of the conflict resolution strategies.
Finally you can configure maxRecordsToSync as an upper bound on items (per-Model) which will be stored locally on the device, as well as fullSyncInterval which is an override of the default 24 hour “base query” which runs as part of the Delta Sync process.
The code below illustrates a conflict resolution handler for the Post model that retries a mutation with the same title, but the most recent remote data for all other fields. The conflict resolution handler discards conflicts for all other models (by returning the DISCARD symbol imported from @aws-amplify/datastore).
import { DISCARD } from '@aws-amplify/datastore';

DataStore.configure({
		errorHandler: error => {
			console.warn('Unrecoverable error', { error });
		},
		conflictHandler: async data => {  // Example conflict handler

			const modelConstructor = data.modelConstructor;

			if (modelConstructor === Post) {

				const remoteModel = data.remoteModel;

				const localModel = data.localModel;

				const newModel = modelConstructor.copyOf(remoteModel, d => {
					d.title = localModel.title;
				});
				return newModel;
			}

			return DISCARD;
		},
		// maxRecordsToSync: 30000,
		fullSyncInterval: 60,        //minutes
	});
Conflict Resolution
When syncing with AWS AppSync, DataStore updates from multiple clients will converge by tracking object versions and adhere to different conflict resolution strategies. The default strategy is called Automerge where GraphQL type information on an object is inspected at runtime to perform merge operations. You can read more about this behavior and alternatives such as Optimistic Concurrency Control and custom Lambda functions in the AWS AppSync documentation. To update the conflict resolution strategies navigate into your project from a terminal and run amplify update api choosing Yes when prompted to change the conflict detection and conflict resolution strategies:
amplify update api #Select GraphQL

? Do you want to configure advanced settings for the GraphQL API
❯ Yes, I want to make some additional changes.

? Configure conflict detection? Yes
? Select the default resolution strategy
  Auto Merge
❯ Optimistic Concurrency
  Custom Lambda
  Learn More
Note that this flow will also allow you to change the strategy on each individual GraphQL type, though is is recommended to use the same strategy for your whole schema unless you have an advanced use case:
? Do you want to override default per model settings? Yes
? Select the models from below:
❯◉ Post
 ◯ PostEditor
 ◯ User

? Select the resolution strategy for Post model Custom Lambda
? Select from the options below (Use arrow keys)
❯ Create a new Lambda Function
  Existing Lambda Function
How it Works
Amplify DataStore is an on device persistent repository for interacting with your local data while it synchronizes with the cloud. The core idea is to focus on your data modeling in your application with GraphQL, adding any authorization rules or business logic into your application when needed. This can be done using Amplify CLI project functionality (amplify add auth or amplify add function) as well as the GraphQL Transformer.
Starting with GraphQL schema (with or without an AWS account) a code generation process creates Models which are domain native constructs for a programming platform (TypeScript, Java, Swift classes). This “modelgen” process happens using the Amplify CLI which is either done manually in your terminal or using build tools that will invoke the CLI process (NPX scripts, Gradle, Xcode build phase).
Once Models have been generated, you can operate on these instances with the DataStore API to save, query, update, delete, or observe changes. At runtime models are passed into a Storage Engine that has a Storage Adapter. The Storage Engine manages a “Model Repository” of Models which were defined by the developer’s GraphQL schema as well as “System Models” which are used for both metadata (such as settings) and queueing updates over the network when syncing to the cloud. Amplify ships with default Storage Adapter implementations, such as SQLite and IndexedDB, however the pattern allows for more in the future for community contributions and is not specific to one technology (e.g. SQL vs NoSQL).
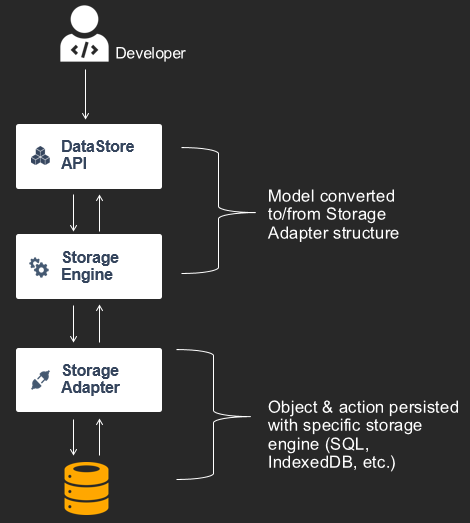
When developer application code interacts with the DataStore API the it is the responsibility of the Storage Engine to store the specific Model for a GraphQL type in the Model Repository as well as serialize & deserialize as appropriate for persistence in the specific Storage Adapter representation. This includes conversion from a GraphQL specific type the appropriate structure in that database engine (e.g. Int to Int64).
If a developer chooses to sync with the cloud, the Amplify CLI will use the GraphQL schema to deploy an AWS AppSync backend with DynamoDB tables for each type and an additional table used for Delta Sync. Other AWS services such as Amazon Cognito or AWS Lambda will also be deployed if added to the project. Once this completes the local configuration for the platform (aws-exports.js or amplifyconfiguration.json) will be generated inside the project and updated with settings and endpoint information.
If the DataStore starts up and sees API information to sync with an AppSync endpoint, it will start an instance of it’s Sync Engine. This component interfaces with the Storage Engine to get updates from the Model Repository. These components use an Observer pattern where the Sync Engine publishes events whenever updates happen in it (such as data being added, updated, or deleted) and both the DataStore API and Sync Engine subscribe to this publication stream. This is how the developer knows when updates have happened from the cloud by interacting with the DataStore API, and conversely how the Sync Engine knows when to communicate with the cloud when applications have made updates to data.
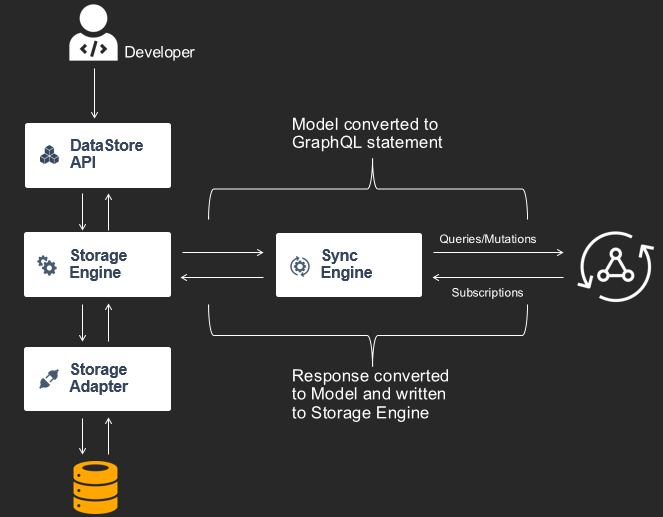
As notifications come into the Sync Engine from the Storage Engine it converts information from the Model Repository into GraphQL statements at runtime. This includes subscribing to all create/update/delete operations for each type, as well as running queries or mutations.
The Sync Engine will run a GraphQL query on first start that hydrates the Storage Engine from the network using a Base Query. This defaults to a limit of 100 items at a time and will paginate through up to 1000 items. It will then store a Last Sync Time and each time the device goes from an offline to online state, it will use this as an argument in a Delta Query. When AppSync receives this Last Sync Time in it’s argument list it will only returned the changes that have been missed by pulling items in a Delta Table.
All items (or “objects”) are versioned by Sync Enabled Resolvers in AppSync using monotonically increasing counters. Clients never update versions, only the service controls versions. The Sync Engine receives new items or updates from GraphQL operations and applies them with their versions to the Storage Engine. When items are updated by application code they are always written to a queue and the Sync Engine sends them to AppSync using the currently known version as an argument (_version) in the mutation.
When multiple clients send concurrent updates using the same version and conflict resolution is configured, a strategy for conflict resolution will be entered. The default strategy for clients is Automerge where the GraphQL type information is used to inspect the update and compare it to the current item that has been written to your table. Any non-conflicting fields are merged with the item and any lists will have values appended, with the service updating the item version as appropriate. You can change this default to apply version checks to the entire object with Optimistic Concurrency where the latest written item to your database will be used with a version check against the incoming record, or alternatively you can use a Lambda function and apply any custom business logic you wish to the process when merging or rejecting updates. In all cases the service controls the versions. For more information on how these conflict resolution rules work please see the AWS AppSync documentation.
Writing data from the AppSync Console
DataStore is designed primarily for developers to not have to focus on the backend and let your application code and workflow create everything. However there will be some use cases where you will use the AppSync console, a Lambda function, or other out of band processes to write data (such as batch actions or data migrations) and you might send GraphQL operations without the DataStore client.
In these cases it’s important that the selection set of your GraphQL mutation includes the fields _lastChangedAt, _version, and _deleted so that the DataStore clients can react to these updates. You will also need to send the current object version in the mutation input argument as _version so that the service can act accordingly. If you do not send this information the clients will still eventually catch up during the global sync process, but you will not see realtime updates to the client DataStore repositories. An example mutation:
mutation UpdatePost {
  updatePost(input: {
    id: "12345"
    title: "updated title 19:40"
    status: ACTIVE
    rating: 5
    _version: 7
  }) {
    id
    title
    status
    rating
    _lastChangedAt
    _version
    _deleted
  }
}
Example React application
App.js
import React, { useEffect } from "react";
import logo from "./logo.svg";
import "./App.css";

import Amplify from "@aws-amplify/core";
import { DataStore, Predicates } from "@aws-amplify/datastore";
import { Post, PostStatus } from "./models";

//Use next two lines only if syncing with the cloud
import awsconfig from "./aws-exports";
Amplify.configure(awsconfig);

function onCreate() {
  DataStore.save(
    new Post({
      title: `New title ${Date.now()}`,
      rating: (function getRandomInt(min, max) {
        min = Math.ceil(min);
        max = Math.floor(max);
        return Math.floor(Math.random() * (max - min)) + min;
      })(1, 7),
      status: PostStatus.ACTIVE
    })
  );
}

function onDeleteAll() {
  DataStore.delete(Post, Predicates.ALL);
}

async function onQuery() {
  const posts = await DataStore.query(Post, c => c.rating("gt", 4));

  console.log(posts);
}

function App() {
  useEffect(() => {
    const subscription = DataStore.observe(Post).subscribe(msg => {
      console.log(msg.model, msg.opType, msg.element);
    });

    return () => subscription.unsubscribe();
  }, []);

  return (
    <div className="App">
      <header className="App-header">
        <img src={logo} className="App-logo" alt="logo" />
        <div>
          <input type="button" value="NEW" onClick={onCreate} />
          <input type="button" value="DELETE ALL" onClick={onDeleteAll} />
          <input type="button" value="QUERY rating > 4" onClick={onQuery} />
        </div>
        <p>
          Edit <code>src/App.js</code> and save to reload.
        </p>
        <a
          className="App-link"
          href="https://reactjs.org"
          target="_blank"
          rel="noopener noreferrer"
        >
          Learn React
        </a>
      </header>
    </div>
  );
}

export default App;
Example React Native application
App.js
/**
 * React Native DataStore Sample App
 */

import React, {Component} from 'react';
import {
  Text,
  StyleSheet,
  ScrollView
} from 'react-native';

import Amplify from "@aws-amplify/core";
import { DataStore, Predicates } from "@aws-amplify/datastore";
import { Post, PostStatus, Comment } from "./src/models";

import awsConfig from "./aws-exports";
Amplify.configure(awsConfig);
let subscription;

class App extends Component {
  constructor(props){
    super(props);
    this.state={
      posts:[]
    }
  }

  componentDidMount() {
    this.onQuery();
    subscription = DataStore.observe(Post).subscribe(msg => {
      console.log('SUBSCRIPTION_UPDATE', msg);
      this.onQuery();
    });
  }

  componentWillUnmount() {
    subscription.unsubscribe();
  }

  onCreatePost() {
    DataStore.save(
      new Post({
        title: `New Post ${Date.now()}`,
        rating: (function getRandomInt(min, max) {
          min = Math.ceil(min);
          max = Math.floor(max);
          return Math.floor(Math.random() * (max - min)) + min; //The maximum is exclusive and the minimum is inclusive
        })(5, 10),
        status: PostStatus.ACTIVE
      })
    );
  }

  async onCreatePostAndComments() {
    const post =  new Post({
      title: `New Post with comments ${Date.now()}`,
      rating: 5,
      status: PostStatus.ACTIVE
    });

    await DataStore.save(
      post
    );

    for(let i=0; i<2; i++) {
      DataStore.save(
        new Comment({
          content: `New comment ${Date.now()}`,
          post
        })
      );
      };
    }

  onQuery = async () => {
    const posts = await DataStore.query(Post, c => c.rating("gt", 2));
    console.log('QUERY_POSTS_RESULT', posts);
    const comments = await DataStore.query(Comment);
    this.setState({posts})
    console.log('QUERY_COMMENTS_RESULT', comments);
  }

  onDelete = async () => {
    const deletedPosts = await DataStore.delete(Post, Predicates.ALL);
    console.log('DELETE_RESULT', deletedPosts);
  }

  render() {
    return (
    <ScrollView style={styles.scrollview} contentContainerStyle={styles.container}>
      <Text style={styles.text} onPress={this.onCreatePost}>Create Post</Text>
      <Text style={styles.text} onPress={this.onCreatePostAndComments}>Create Post & Comments</Text>
      <Text style={styles.text} onPress={this.onQuery}>Query Posts</Text>
      <Text style={styles.text} onPress={this.onDelete}>Delete All Posts</Text>
      {this.state.posts.map((post, i)=><Text key={i}>{`${post.title} ${post.rating}`}</Text>)}
    </ScrollView>
    );
  }
}

const styles = StyleSheet.create({
  scrollview: {
    paddingTop: 40,
    flex:1
  },
  container: {
    alignItems: 'center'
  },
  text: {
    fontSize: 20,
    textAlign: 'center',
    margin: 10,
  }
});

export default App;
API Reference
For the complete API documentation for DataStore, visit our API Reference