

XR
The XR category enables you to work with augmented reality (AR) and virtual reality (VR) content within your applications. The XR category has built-in support for Amazon Sumerian.
Configuration
Publishing a scene
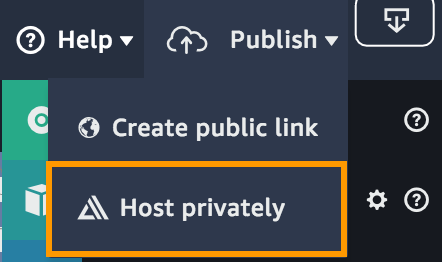
To download the required scene configuration for your Sumerian scene, visit Amazon Sumerian console, create or open the scene you would like to use with AWS Amplify, click Publish dropdown from the top right corner of the Sumerian console, then click Host privately:
If your scene was already published publicly, you will need to unpublish then publish again using the instructions below.
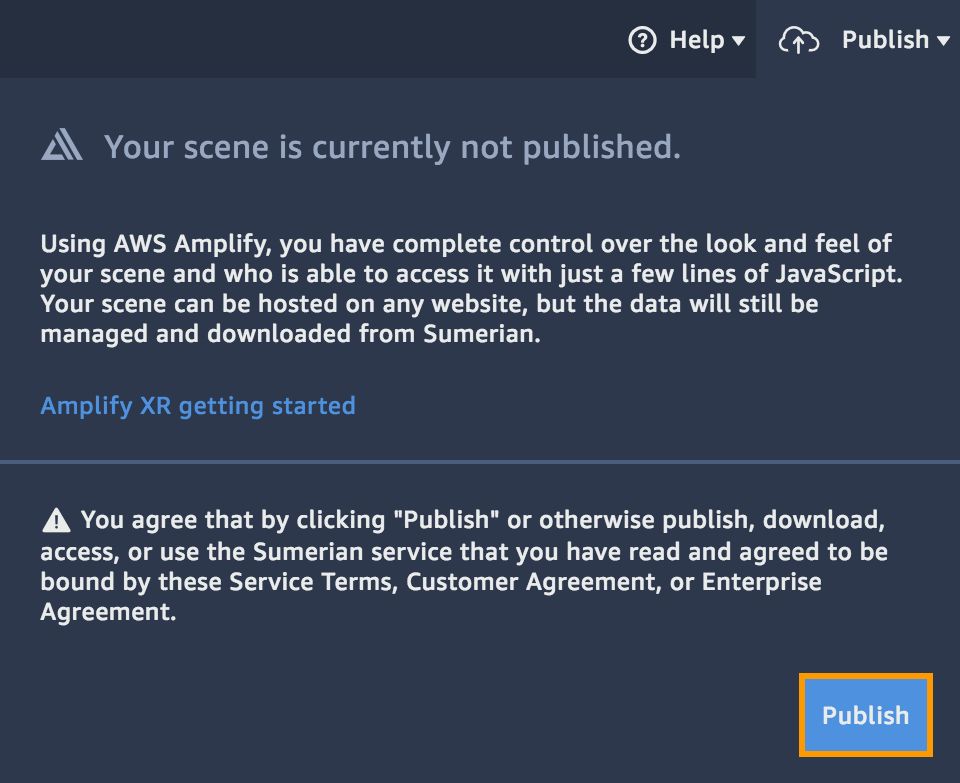
You will then be prompted with the following dialog. Click the Publish button:
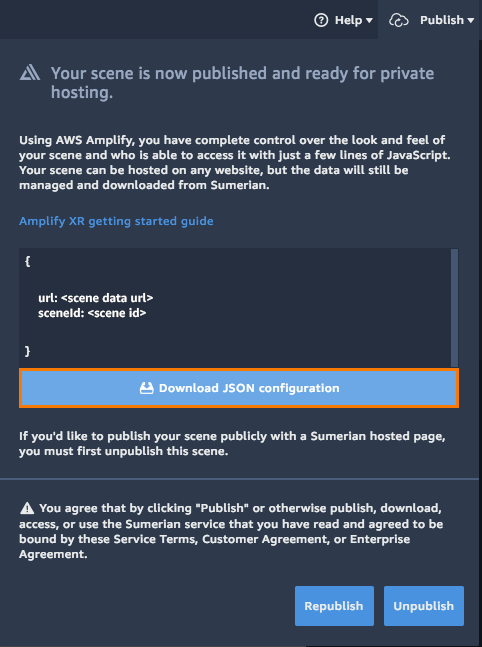
Now click the Download JSON configuration button to download the scene configuration JSON that will be used for configuring your scene within AWS Amplify:
Automatic setup using Amplify CLI
Prerequisite: Install and configure the Amplify CLI
Requires: Amplify CLI version >= 1.4.0
$ amplify add xr
The CLI will prompt configuration options for the XR category such as a scene name identifier and a Sumerian scene json configuration file.
The XR category will set up and utilize the Authentication category to setup scene authorization.
Take note of the scene name you provide in the CLI prompt. This value will be used as an identifier for the scene when using the XR category in the framework.
After configuring your XR options, update your backend with:
$ amplify push
XR resources shown during amplify push represent the IAM policy being created for the scene. This will not change the scene shown in the Sumerian console. To learn more about Sumerian scene authorization visit Amazon Sumerian Permissions
A configuration file called aws-exports.js will be copied to your configured source directory, for example ./src. This file will contain a list of all scenes that you configure.
Configure Your App
import Amplify, { XR } from 'aws-amplify';
import awsconfig from './aws-exports';

Amplify.configure(awsconfig);
For more information about using amplify xr in the Amplify CLI type amplify xr help in your Amplify project.
Manual setup
Add the following code to your application to configure the XR category:
import Amplify from 'aws-amplify';
import awsconfig from './aws-exports';
import scene1Config from './sumerian_exports_<sceneId>'; // This file will be generated by the Sumerian AWS Console

Amplify.configure({
  ...awsconfig,
  XR: { // XR category configuration
    region: 'us-west-2', // Sumerian region
    scenes: {
      "scene1": { // Friendly scene name
        sceneConfig: scene1Config // Scene configuration from Sumerian publish
      }
    }
  }
});
You can add optional publish parameters to the scene configuration:
XR.configure({ // XR category configuration
  region: 'us-west-2', // Sumerian region
  scenes: {
    "scene1": { // Friendly scene name
      sceneConfig: scene1Config // Scene configuration from Sumerian publish
      publishParamOverrides: { alpha: true } // Optional publish parameters
    }
  }
});
Scene Usage
The XR Category allows a Sumerian scene to be rendered into an DIV HTML element with loadScene method. When the scene has been loaded the XR.start() method will start the scene. To render the scene, pass your scene name and the id of the element in the method call:
// Load scene with sceneName: "scene1" into dom element id: "sumerian-scene-dom-id"
async loadAndStartScene() {
    await XR.loadScene("scene1", "sumerian-scene-dom-id");
    XR.start("scene1");
}

// HTML
<div id="sumerian-scene-dom-id"></div>
Additionally, you can use the Sumerian Scene UI components for an out-of-the-box UI solution.
Scene API
Using optional progress handlers and options
To configure the appearance and the behavior of your Sumerian scene, you can use sceneOptions parameter in the method call:
async loadAndStartScene() {
    const progressCallback = (progress) => {
        console.log(`Sumerian scene load progress: ${progress * 100}%`);
    }

    const sceneOptions = {
        progressCallback
    }

    await XR.loadScene("scene1", "sumerian-scene-dom-id", sceneOptions);
    XR.start("scene1");
}
Retrieving the Scene Information
You can check the loading status of the scene with isSceneLoaded method. Also, you can use isMuted method to retrieve audio information about the loaded scene:
if (XR.isSceneLoaded('scene1')) {

    if (XR.isMuted('scene1')) {
        // The scene is muted
        XR.setMuted('scene1', false) // Unmute
    }

}
Entering VR mode
For compatible devices, you can enable VR mode for your scene. When a user enters VR mode with a controller attached, the VR controller component tracks its location in 3D space.
Entering VR requires user input i.e. button press or similar.
if (XR.isSceneLoaded('scene1')) {

    if (XR.isVRCapable('scene1')) {
        XR.enterVR('scene1')
    }

}
Capturing Audio Events
XR Category’s scene controller emits audio-related events during scene playback. You can subscribe to those events with XR.onSceneEvent and provide audio controls in your app, e.g.: providing a volume on button when the browser audio is disabled.
XR.onSceneEvent('scene1', 'AudioEnabled', () => console.log ('Audio is enabled') );
XR.onSceneEvent('scene1', 'AudioDisabled', () => console.log ('Audio is disabled') ));
Enabling Audio
In some browsers, playback of audio is disabled until the user provides input. To reliably enable audio in your scene, wait until the user’s first input, such as a mouse click or screen touch, and then call the enableAudio() method with the scene name.
If the browser is blocking autoplay, the Audio Disabled event will get thrown the first time the scene attempts to PLAY audio, if no user input has been given
XR.enableAudio('scene1')
API Reference
For a complete XR reference visit the API Reference
UI Components
Sumerian Scene
After you have published and configured your Sumerian scene you can use a Sumerian Scene UI component in one of the following supported frameworks
Note: Each of the following UI components will inherit the height and width of the direct parent DOM element. Make sure to set the width and height styling on the parent DOM element to your desired size.
React
Installation
$ npm install aws-amplify-react
Usage
import { SumerianScene } from 'aws-amplify-react';
...

render() {
  return (
    <div className="App">
      // sceneName: the configured friendly scene you would like to load
      <SumerianScene sceneName="scene1" />
    </div>
  );
}
See React configuration for additional configuration details.
Angular
Installation
$ npm install aws-amplify-angular
Theme
In styles.css:
@import '~aws-amplify-angular/theme.css';
Usage
// sceneName: the configured friendly scene you would like to load
<amplify-sumerian-scene sceneName="scene1"></amplify-sumerian-scene>
See Angular configuration for additional configuration details.
Ionic
Installation
$ npm install aws-amplify-angular
Theme
In global.scss:
@import '~aws-amplify-angular/ionic.css';
Usage
// sceneName: the configured friendly scene you would like to load
<amplify-sumerian-scene sceneName="scene1" framework="Ionic"></amplify-sumerian-scene>
See Ionic configuration for additional configuration details.
Vue
Installation
$ npm install aws-amplify-vue
Usage
// scene-name: the configured friendly scene you would like to load
<amplify-sumerian-scene scene-name="scene1"></amplify-sumerian-scene>
See Vue configuration for additional configuration details.