

Note This guide shows how to build an app using AWS Mobile SDK for Android and the Amplify CLI toolchain. To use our new, preview developer experience with new Amplify Libraries for Android, click here.
Storage
S3
Overview
Enable your app to store and retrieve user files from cloud storage with the permissions model that suits your purpose. The CLI deploys and configures cloud storage buckets using Amazon Simple Storage Service.
Note
This guide specifically uses TransferUtility, which is a high-level wrapper over AmazonS3Client. TransferUtility is a tool that simplifies asynchronous transfer management (i.e. upload and download), and it may not contain all of the features available in Amazon S3 service. To access low-level features such as bucket manipulation and object deletion, please refer to the documentation for AmazonS3Client.
Storage Access
The CLI configures three different access levels on the storage bucket: public, protected and private. When you run amplify add storage, the CLI will configure appropriate IAM policies on the bucket using a Cognito Identity Pool Role. You will have the option of adding CRUD (Create/Update, Read and Delete) based permissions as well, so that Authenticated and Guest users will be granted limited permissions within these levels.
If you had previously enabled user sign-in by running amplify add auth in your project, the policies will be connected to an Authenticated Role of the Identity Pool which has scoped permission to the objects in the bucket for each user identity. If you haven’t configured user sign-in, then an Unauthenticated Role will be assigned for each unique user/device combination, which still has scoped permissions to just their objects.
- Public: Accessible by all users of your app. Files are stored under the
public/path in your S3 bucket. - Protected: Readable by all users, but writable only by the creating user. Files are stored under
protected/{user_identity_id}/where theuser_identity_idcorresponds to the unique Amazon Cognito Identity ID for that user. - Private: Only accessible for the individual user. Files are stored under
private/{user_identity_id}/where theuser_identity_idcorresponds to the unique Amazon Cognito Identity ID for that user.
See Authentication for more information on how to get the user_identity_id for a signed in user.
Set Up Your Backend
-
Complete the Get Started steps before you proceed.
-
Use the CLI to add storage to your cloud-enabled backend and app.
In a terminal window, navigate to your project folder (the folder that typically contains your project level build.gradle), and add the SDK to your app.
$ cd ./YOUR_PROJECT_FOLDER $ amplify add storage -
Choose
Contentas your storage service.❯ Content (Images, audio, video, etc.) -
The combination of friendly name and bucket name must be globally unique. If another S3 user has specified the same values for both of these as you, the amplify push step below will fail.
-
The CLI walks you through the options to enable Auth (if not enabled previously), to name your S3 bucket, and to decide who should have access (select
Auth and guest usersand toggle all to selectcreate/update, read, and deleteaccess for both auth and guest users). -
Confirm that you have Storage and Auth set up.
$ amplify status | Category | Resource name | Operation | Provider plugin | | --------- | --------------- | --------- | ----------------- | | Auth | cognito2e202b09 | Create | awscloudformation | | Storage | sabc0123de | Create | awscloudformation | -
To create your backend run:
$ amplify pushThe CLI will create the awsconfiguration.json file in your project’s
res/rawdirectory.
Lambda Triggers
If you want to enable triggers for the storage category with Amazon S3 & Amazon DynamoDB as providers, the CLI supports associating Lambda triggers with S3 and DynamoDB events. For example, this can be useful for a use case where you want to invoke a Lambda function after a create or update operation on a DynamoDB table managed by the Amplify CLI. Read More
Connect to Your Backend
Use the following steps to connect add file storage backend services to your app.
-
Add the following to
app/build.gradle(Module:app):dependencies { implementation 'com.amazonaws:aws-android-sdk-s3:2.15.+' implementation ('com.amazonaws:aws-android-sdk-mobile-client:2.15.+@aar') { transitive = true } implementation ('com.amazonaws:aws-android-sdk-auth-userpools:2.15.+@aar') { transitive = true } }Perform a
Gradle Syncto download the AWS Mobile SDK components into your app. -
Add the following to
AndroidManifest.xml:<uses-permission android:name="android.permission.WRITE_EXTERNAL_STORAGE" /> <service android:name="com.amazonaws.mobileconnectors.s3.transferutility.TransferService" android:enabled="true" /> -
For Android Q (API 29): API 29 enforces scoped storage access for Android apps. To gain access to legacy external storage, enable the following application property inside
AndroidManifest.xml:<application> android:requestLegacyExternalStorage="true" </application>
Mocking and Local Testing
Amplify supports running a local mock server for testing your application with S3. Please see the CLI Toolchain documentation for more details.
Using TransferUtility
To make it easy to upload and download objects from Amazon S3, we provide a TransferUtility component with built-in support for background transfers, progress tracking, and MultiPart uploads. The Transfer Utility component set includes a Service called the TransferService, which monitors network connectivity changes. When the device goes offline, the TransferService will pause all ongoing transfers; when the device is back online, the Transfer Service will resume paused transfers.
Starting with version 2.7.0, the TransferService will not be automatically started or stopped by TransferUtility. You have to start TransferService manually from your application. A recommended way is to start the service upon Application startup, by including the following line in the onCreate method of your app’s Application class.
getApplicationContext().startService(new Intent(getApplicationContext(), TransferService.class));
This section explains how to implement upload and download functionality and a number of additional storage use cases.
Note: If you use the transfer utility MultiPart upload feature, take advantage of automatic cleanup features by setting up the AbortIncompleteMultipartUpload action in your Amazon S3 bucket life cycle configuration.
Upload a File
The following example shows how to use the TransferUtility to upload a file. Instantiate the TransferUtility object using the provided TransferUtility builder function. Use the AWSMobileClient to get the AWSConfiguration and AWSCredentialsProvider to pass into the builder. See Authentication for more details.
The TransferUtility checks the size of the file being uploaded and automatically switches over to using multi-part uploads if the file size exceeds 5 MB.
import android.app.Activity;
import android.content.Intent;
import android.os.Bundle;
import android.util.Log;

import com.amazonaws.mobile.client.AWSMobileClient;
import com.amazonaws.mobile.client.Callback;
import com.amazonaws.mobile.client.UserStateDetails;
import com.amazonaws.mobileconnectors.s3.transferutility.TransferListener;
import com.amazonaws.mobileconnectors.s3.transferutility.TransferObserver;
import com.amazonaws.mobileconnectors.s3.transferutility.TransferService;
import com.amazonaws.mobileconnectors.s3.transferutility.TransferState;
import com.amazonaws.mobileconnectors.s3.transferutility.TransferUtility;
import com.amazonaws.services.s3.AmazonS3Client;

import java.io.BufferedWriter;
import java.io.File;
import java.io.FileWriter;

public class MainActivity extends Activity {
    private static final String TAG = MainActivity.class.getSimpleName();

    @Override
    protected void onCreate(Bundle savedInstanceState) {
        super.onCreate(savedInstanceState);
        setContentView(R.layout.activity_main);

        getApplicationContext().startService(new Intent(getApplicationContext(), TransferService.class));

        // Initialize the AWSMobileClient if not initialized
        AWSMobileClient.getInstance().initialize(getApplicationContext(), new Callback<UserStateDetails>() {
            @Override
            public void onResult(UserStateDetails userStateDetails) {
                Log.i(TAG, "AWSMobileClient initialized. User State is " + userStateDetails.getUserState());
                uploadWithTransferUtility();
            }

            @Override
            public void onError(Exception e) {
                Log.e(TAG, "Initialization error.", e);
            }
        });

    }

    public void uploadWithTransferUtility() {

        TransferUtility transferUtility =
                TransferUtility.builder()
                        .context(getApplicationContext())
                        .awsConfiguration(AWSMobileClient.getInstance().getConfiguration())
                        .s3Client(new AmazonS3Client(AWSMobileClient.getInstance()))
                        .build();

        File file = new File(getApplicationContext().getFilesDir(), "sample.txt");
        try {
            BufferedWriter writer = new BufferedWriter(new FileWriter(file));
            writer.append("Howdy World!");
            writer.close();
        }
        catch(Exception e) {
            Log.e(TAG, e.getMessage());
        }

        TransferObserver uploadObserver =
                transferUtility.upload(
                        "public/sample.txt",
                        new File(getApplicationContext().getFilesDir(),"sample.txt"));

        // Attach a listener to the observer to get state update and progress notifications
        uploadObserver.setTransferListener(new TransferListener() {

            @Override
            public void onStateChanged(int id, TransferState state) {
                if (TransferState.COMPLETED == state) {
                    // Handle a completed upload.
                }
            }

            @Override
            public void onProgressChanged(int id, long bytesCurrent, long bytesTotal) {
                float percentDonef = ((float) bytesCurrent / (float) bytesTotal) * 100;
                int percentDone = (int)percentDonef;

                Log.d(TAG, "ID:" + id + " bytesCurrent: " + bytesCurrent
                        + " bytesTotal: " + bytesTotal + " " + percentDone + "%");
            }

            @Override
            public void onError(int id, Exception ex) {
                // Handle errors
            }

        });

        // If you prefer to poll for the data, instead of attaching a
        // listener, check for the state and progress in the observer.
        if (TransferState.COMPLETED == uploadObserver.getState()) {
            // Handle a completed upload.
        }

        Log.d(TAG, "Bytes Transferred: " + uploadObserver.getBytesTransferred());
        Log.d(TAG, "Bytes Total: " + uploadObserver.getBytesTotal());
    }
}
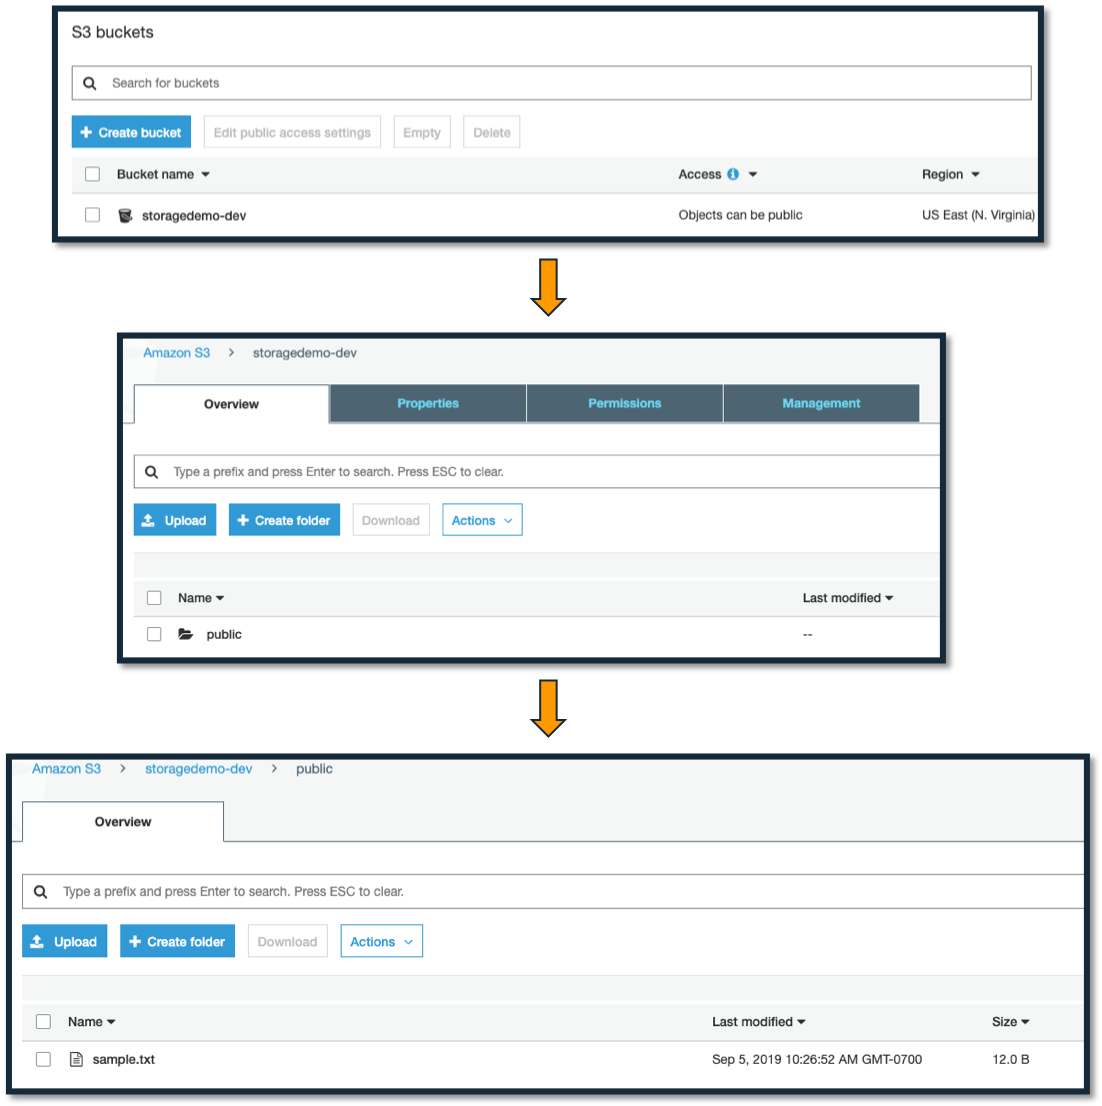
If you run this code, login to your AWS console, and go to the S3 service, you’ll see a bucket and file structure like this (in this example the friendly name specified was dev and the bucket name was storagedemo):
Download a File
The following example shows how to use the TransferUtility to download a file. Instantiate the TransferUtility object using the provided TransferUtility builder function. Use the AWSMobileClient to get the AWSConfiguration and AWSCredentialsProvider to pass into the builder. See Authentication for more details.
import android.app.Activity;
import android.content.Intent;
import android.os.Bundle;
import android.util.Log;

import com.amazonaws.mobile.client.AWSMobileClient;
import com.amazonaws.mobile.client.Callback;
import com.amazonaws.mobile.client.UserStateDetails;
import com.amazonaws.mobileconnectors.s3.transferutility.TransferListener;
import com.amazonaws.mobileconnectors.s3.transferutility.TransferObserver;
import com.amazonaws.mobileconnectors.s3.transferutility.TransferService;
import com.amazonaws.mobileconnectors.s3.transferutility.TransferState;
import com.amazonaws.mobileconnectors.s3.transferutility.TransferUtility;
import com.amazonaws.services.s3.AmazonS3Client;

import java.io.BufferedWriter;
import java.io.File;
import java.io.FileWriter;

public class MainActivity extends Activity {
    private static final String TAG = MainActivity.class.getSimpleName();

    @Override
    protected void onCreate(Bundle savedInstanceState) {
        super.onCreate(savedInstanceState);
        setContentView(R.layout.activity_main);

        getApplicationContext().startService(new Intent(getApplicationContext(), TransferService.class));

        // Initialize the AWSMobileClient if not initialized
        AWSMobileClient.getInstance().initialize(getApplicationContext(), new Callback<UserStateDetails>() {
            @Override
            public void onResult(UserStateDetails userStateDetails) {
                Log.i(TAG, "AWSMobileClient initialized. User State is " + userStateDetails.getUserState());
                downloadWithTransferUtility();
            }

            @Override
            public void onError(Exception e) {
                Log.e(TAG, "Initialization error.", e);
            }
        });

    }

    private void downloadWithTransferUtility() {

        TransferUtility transferUtility =
                TransferUtility.builder()
                        .context(getApplicationContext())
                        .awsConfiguration(AWSMobileClient.getInstance().getConfiguration())
                        .s3Client(new AmazonS3Client(AWSMobileClient.getInstance()))
                        .build();

        TransferObserver downloadObserver =
                transferUtility.download(
                        "public/sample.txt",
                        new File(getApplicationContext().getFilesDir(), "download.txt"));

        // Attach a listener to the observer to get state update and progress notifications
        downloadObserver.setTransferListener(new TransferListener() {

            @Override
            public void onStateChanged(int id, TransferState state) {
                if (TransferState.COMPLETED == state) {
                    // Handle a completed upload.
                }
            }

            @Override
            public void onProgressChanged(int id, long bytesCurrent, long bytesTotal) {
                float percentDonef = ((float)bytesCurrent/(float)bytesTotal) * 100;
                int percentDone = (int)percentDonef;

                Log.d("Your Activity", "   ID:" + id + "   bytesCurrent: " + bytesCurrent + "   bytesTotal: " + bytesTotal + " " + percentDone + "%");
            }

            @Override
            public void onError(int id, Exception ex) {
                // Handle errors
            }

        });

        // If you prefer to poll for the data, instead of attaching a
        // listener, check for the state and progress in the observer.
        if (TransferState.COMPLETED == downloadObserver.getState()) {
            // Handle a completed upload.
        }

        Log.d("Your Activity", "Bytes Transferred: " + downloadObserver.getBytesTransferred());
        Log.d("Your Activity", "Bytes Total: " + downloadObserver.getBytesTotal());
    }
}
Track Transfer Progress
With the TransferUtility, the download and upload methods return a TransferObserver object. This object gives access to:
- The transfer state, as an
enum - The total bytes that have been transferred so far
- The total bytes remaining to transfer
- A unique ID that you can use to keep track of each transfer
Given the transfer ID, the TransferObserver object can be retrieved from anywhere in your app, even if the app was terminated during a transfer. It also lets you create a TransferListener, which will be updated on changes to transfer state, progress, and when an error occurs.
To get the progress of a transfer, call setTransferListener() on your TransferObserver. This requires you to implement onStateChanged, onProgressChanged, and onError as shown in the example.
TransferObserver transferObserver = download(MY_BUCKET, OBJECT_KEY, MY_FILE);
transferObserver.setTransferListener(new TransferListener(){

    @Override
    public void onStateChanged(int id, TransferState state) {
        // do something
    }

    @Override
    public void onProgressChanged(int id, long bytesCurrent, long bytesTotal) {
        int percentage = (int) (bytesCurrent/bytesTotal * 100);
        //Display percentage transferred to user
    }

    @Override
    public void onError(int id, Exception ex) {
        // do something
    }
});
The transfer ID can be retrieved from the TransferObserver object that is returned from the upload or download function. You can also query for TransferObservers using the getTransfersWithType(transferType) or the getTransfersWithTypeAndState(transferType, transferState) method.
// Gets id of the transfer.
int transferId = transferObserver.getId();
Pause a Transfer
Transfers can be paused using the pause(transferId) method. If your app is terminated, crashes, or loses Internet connectivity, transfers are automatically paused.
To pause a single transfer:
transferUtility.pause(idOfTransferToBePaused);
To pause all uploads:
transferUtility.pauseAllWithType(TransferType.UPLOAD);
To pause all downloads:
transferUtility.pauseAllWithType(TransferType.DOWNLOAD);
To pause all transfers of any type:
transferUtility.pauseAllWithType(TransferType.ANY);
Resume a Transfer
In the case of a loss in network connectivity, transfers will automatically resume when network connectivity is restored. If the app crashed or was terminated by the operating system, transfers can be resumed with the resume(transferId) method.
To resume a single transfer:
transferUtility.resume(idOfTransferToBeResumed);
To resume all uploads:
transferUtility.resumeAllWithType(TransferType.UPLOAD);
To resume all downloads:
transferUtility.resumeAllWithType(TransferType.DOWNLOAD);
To resume all transfers of any type:
transferUtility.resumeAllWithType(TransferType.ANY);
Cancel a Transfer
To cancel an upload, call cancel() or cancelAllWithType() on the TransferUtility object.
To cancel a single transfer, use:
transferUtility.cancel(idToBeCancelled);
To cancel all transfers of a certain type, use:
transferUtility.cancelAllWithType(TransferType.DOWNLOAD);
Background Transfers
The SDK uploads and downloads objects from Amazon S3 using background threads. These transfers will continue to run regardless of whether your app is running in the foreground or background.
Long-running Transfers
When you want your app to perform long-running transfers in the background, you can initiate the transfers from a background service that you can implement within your app. A recommended way to use a service to initiate the transfer is demonstrated in the Transfer Utility sample application.
Supporting TransferService on Oreo and above
TransferNetworkLossHandler, a broadcast receiver that listens for network connectivity changes is introduced in 2.11.0. TransferNetworkLossHandler pauses the on-going transfers when the network goes offline and resumes the transfers that were paused when the network comes back online. TransferService registers the TransferNetworkLossHandler when the service is created and de-registers the handler when the service is destroyed.
TransferServicewill be moved to the foreground state when the device is running Android Oreo (API Level 26) and above.- Transitioning to the foreground state requires a valid on-going
Notificationobject, identifier for on-going notification and the flag that determines the ability to remove the on-going notification when the service transitions out of foreground state. If a valid notification object is not passed in, the service will not be transitioned into the foreground state. - The
TransferServicecan now be started usingstartForegroundServicemethod to move the service to foreground state. The service can be invoked in the following way to transition the service to foreground state.
- Transitioning to the foreground state requires a valid on-going
Intent tsIntent = new Intent(getApplicationContext(), TransferService.class);
tsIntent.putExtra(TransferService.INTENT_KEY_NOTIFICATION, <notification-object>);
tsIntent.putExtra(TransferService.INTENT_KEY_NOTIFICATION_ID, <notification-id>);
tsIntent.putExtra(TransferService.INTENT_KEY_REMOVE_NOTIFICATION, <remove-notification-when-service-stops-foreground>);
getApplicationContext().startForegroundService(tsIntent);
Supporting Unicode characters in key-names
Upload/download objects
-
Since
2.4.0version of the SDK, the key name containing characters that require special handling are URL encoded and escaped( space, %2A, ~, /, :, ', (, ), !, [, ] )by theAmazonS3Client, after which the AWS Android Core Runtime encodes the URL resulting in double encoding of the key name. -
Starting
2.11.0, the additional layer of encoding and escaping done byAmazonS3Clientis removed. The key name will not be encoded and escaped byAmazonS3Client. Now, the key name that is given toAmazonS3ClientorTransferUtilitywill appear on the Amazon S3 console as is.
List Objects
- When a S3 bucket contains objects with key names containing characters that require special handling, and since the SDK has an XML parser, (XML 1.0 parser) which cannot parse some characters, the SDK is required to request that Amazon S3 encode the keys in the response. This can be done by passing in
urlasencodingTypein theListObjectsRequest.
AmazonS3Client s3 = new AmazonS3Client(credentials);
final ObjectListing objectListing = s3.listObjects(
                new ListObjectsRequest(bucketName, prefix, null, null, null)
                    .withEncodingType(Constants.URL_ENCODING));
-
Since
2.4.0, there was a bug where the SDK did not decode the key names which are encoded by S3 whenurlis requested as theencodingType. This is fixed in2.11.0, where the SDK will decode the key names in theListObjectsResponsesent by S3. -
If you have objects in S3 bucket that has a key name containing characters that require special handling, you need to pass the
encodingTypeasurlin theListObjectsRequest.
Transfer with Object Metadata
To upload a file with metadata, use the ObjectMetadata object. Create a ObjectMetadata object and add in the metadata headers and pass it to the upload function.
import com.amazonaws.services.s3.model.ObjectMetadata;

ObjectMetadata myObjectMetadata = new ObjectMetadata();

//create a map to store user metadata
Map<String, String> userMetadata = new HashMap<String,String>();
userMetadata.put("myKey","myVal");

//call setUserMetadata on our ObjectMetadata object, passing it our map
myObjectMetadata.setUserMetadata(userMetadata);
Then, upload an object along with its metadata:
TransferObserver observer = transferUtility.upload(
  MY_BUCKET,        /* The bucket to upload to */
  OBJECT_KEY,       /* The key for the uploaded object */
  MY_FILE,          /* The file where the data to upload exists */
  myObjectMetadata  /* The ObjectMetadata associated with the object*/
);
To download the metadata, use the S3 getObjectMetadata method. See the API Reference and Object Key and Metadata for more information.
Transfer Utility Options
You can use the TransferUtilityOptions object to customize the operations of the TransferUtility.
TransferThreadPoolSize
This parameter allows you to specify the number of transfers that can run in parallel. By increasing the number of threads, you will be able to increase the number of parts of a multi-part upload that will be uploaded in parallel. By default, this is set to 2 * (N + 1), where N is the number of available processors on the mobile device. The minimum allowed value is 2.
TransferUtilityOptions options = new TransferUtilityOptions();
options.setTransferThreadPoolSize(8);

TransferUtility transferUtility = TransferUtility.builder()
    // Pass-in S3Client, Context, AWSConfiguration/DefaultBucket Name
    .transferUtilityOptions(options)
    .build();
TransferNetworkConnectionType
The TransferNetworkConnectionType option allows you to restrict the type of network connection (WiFi / Mobile / ANY) over which the data can be transferred to Amazon S3.
TransferUtilityOptions options = new TransferUtilityOptions(10, TransferNetworkConnectionType.WIFI);

TransferUtility transferUtility = TransferUtility.builder()
    // Pass-in S3Client, Context, AWSConfiguration/DefaultBucket Name
    .transferUtilityOptions(options)
    .build();
By specifying TransferNetworkConnectionType.WIFI , data transfers to and from S3 will only happen when the device is on a WiFi connection
Usage with GraphQL APIs (Complex Objects)
Note: Please review the documentation for API before you proceed with the rest of this section.
You can also upload and download Amazon S3 Objects using AWS AppSync, a GraphQL based solution to build data-driven apps with real-time and offline capabilities. Sometimes you might want to create logical objects that have more complex data, such as images or videos, as part of their structure. For example, you might create a Person type with a profile picture or a Post type that has an associated image. You can use AWS AppSync to model these as GraphQL types. If any of your mutations have a variable with bucket, key, region, mimeType, and localUri fields, the SDK uploads the file to Amazon S3 for you.
Attach the following policy to your IAM role to grant it programmatic read-write access to your bucket:
{
  "Version": "2012-10-17",
  "Statement": [
    {
      "Effect": "Allow",
      "Action": ["s3:ListBucket"],
      "Resource": ["arn:aws:s3:::myBucket"]
    },
    {
      "Effect": "Allow",
      "Action": [
        "s3:PutObject",
        "s3:GetObject"
      ],
      "Resource": ["arn:aws:s3:::myBucket/*"]
    }
  ]
}
Schema Setup
If any mutations have an input type S3ObjectInput with fields bucket, key, region, mimeType and localUri fields, the SDK will upload the file to S3.
  input S3ObjectInput {
    bucket: String!
    key: String!
    region: String!
    localUri: String
    mimeType: String
  }
For example, to add a photo field in the Post type. Update Post type, add the new S3ObjectInput type and add a new mutation, putPostWithPhoto.
  type Mutation {
      ...other mutations here...
      putPostWithPhoto(
          id: ID!,
          author: String!,
          title: String,
          content: String,
          url: String,
          ups: Int,
          downs: Int,
          photo: S3ObjectInput
          version: Int!
      ): Post
  }
  type S3Object {
       bucket: String!
       key: String!
       region: String!
  }
  input S3ObjectInput {
       bucket: String!
       key: String!
       region: String!
       localUri: String
       mimeType: String
  }
  type Post {
      id: ID!
      author: String!
      title: String
      content: String
      url: String
      ups: Int
      downs: Int
      photo: S3Object
      version: Int!
  }
Next, update the putPostWithPhoto mutation resolver to use PutItemWithS3Object template for request mapping
and Return single item for response mapping from the AppSync console.
Next, update the response mapping template for the photo field.
$util.toJson($util.dynamodb.fromS3ObjectJson($context.source.file))
Client Code
To use complex objects, you need AWS Identity and Access Management credentials for reading and writing to Amazon S3.
These can be separate from the other authentication credentials used in the AWS AppSync client.
Credentials for complex objects are set in the S3ObjectManagerImplementation builder parameter, which you can use like the following:
public class ClientFactory {
    // ...other code...
    private static volatile AWSAppSyncClient client;
    private static volatile S3ObjectManagerImplementation s3ObjectManager;
    public static AWSAppSyncClient getInstance(Context context) {
      if (client == null) {
        client = AWSAppSyncClient.builder()
                .context(context)
                .awsConfiguration(new AWSConfiguration(context))
                .s3ObjectManager(getS3ObjectManager(context)) // Here we initialize the s3 object manager.
                .build();
      }
      return client;
    }
    // Copy the below two methods and add the .s3ObjectManager builder parameter
    // initialize and fetch the S3 Client
    public static final S3ObjectManagerImplementation getS3ObjectManager(final Context context) {
      if (s3ObjectManager == null) {
          AmazonS3Client s3Client = new AmazonS3Client(getCredentialsProvider(context));
          s3Client.setRegion(Region.getRegion("us-east-1")); // you can set the region of bucket here
          s3ObjectManager = new S3ObjectManagerImplementation(s3Client);
      }
      return s3ObjectManager;
    }
    // initialize and fetch cognito credentials provider for S3 Object Manager
    public static final AWSCredentialsProvider getCredentialsProvider(final Context context){
    final CognitoCachingCredentialsProvider credentialsProvider = new CognitoCachingCredentialsProvider(
            context,
            Constants.COGNITO_IDENTITY, // Identity pool ID
            Regions.fromName(Constants.COGNITO_REGION) // Region
            );
      return credentialsProvider;
    }
}
The SDK uploads the file found at the localUri when the bucket, key, region, localUri, and mimeType are all provided.
Now, the SDK uploads any field which has S3ObjectInput type in the mutation. The only requirement from a developer is to provide the correct bucket, key, region, localUri, and mimeType.
Example:
Add the following permissions to AndroidManifest.xml:
<uses-permission android:name="android.permission.READ_EXTERNAL_STORAGE" />
Then, in your activity where you are adding a post, update the code as follows:
public class AddPostActivity extends AppCompatActivity {
    // ...other code...
    // Photo selector application code.
    private static int RESULT_LOAD_IMAGE = 1;
    private String photoPath;
    public void choosePhoto() {
        Intent i = new Intent(Intent.ACTION_PICK, android.provider.MediaStore.Images.Media.EXTERNAL_CONTENT_URI);
        startActivityForResult(i, RESULT_LOAD_IMAGE);
    }
    @Override
    protected void onActivityResult(int requestCode, int resultCode, Intent data) {
        super.onActivityResult(requestCode, resultCode, data);
        if (requestCode == RESULT_LOAD_IMAGE && resultCode == RESULT_OK && null != data) {
            Uri selectedImage = data.getData();
            String[] filePathColumn = {MediaStore.Images.Media.DATA};
            Cursor cursor = getContentResolver().query(selectedImage,
                    filePathColumn, null, null, null);
            cursor.moveToFirst();
            int columnIndex = cursor.getColumnIndex(filePathColumn[0]);
            String picturePath = cursor.getString(columnIndex);
            cursor.close();
            // String picturePath contains the path of selected Image
            photoPath = picturePath;
        }
    }
    // Actual mutation code
    private void save() {
        final String title = ((EditText) findViewById(R.id.updateTitle)).getText().toString();
        final String author = ((EditText) findViewById(R.id.updateAuthor)).getText().toString();
        final String url = ((EditText) findViewById(R.id.updateUrl)).getText().toString();
        final String content = ((EditText) findViewById(R.id.updateContent)).getText().toString();
        S3ObjectInput s3ObjectInput = S3ObjectInput.builder()
            .bucket("YOUR_BUCKET_NAME")
            .key("public/"+ UUID.randomUUID().toString())
            .region("us-east-1")
            .localUri(photoPath)
            .mimeType("image/jpg").build();
        PutPostWithPhotoMutation addPostMutation = PutPostWithPhotoMutation.builder()
                .title(title)
                .author(author)
                .url(url)
                .content(content)
                .ups(0)
                .downs(0)
                .photo(s3ObjectInput)
                .expectedVersion(1)
                .build();
        ClientFactory.getInstance(this).mutate(addPostMutation).enqueue(postsCallback);
    }
    // Mutation callback code
    private GraphQLCall.Callback<PutPostWithPhotoMutation.Data> postsCallback = new GraphQLCall.Callback<PutPostWithPhotoMutation.Data>() {
        @Override
        public void onResponse(@Nonnull final Response<PutPostWithPhotoMutation.Data> response) {
            runOnUiThread(new Runnable() {
                @Override
                public void run() {
                    Toast.makeText(AddPostActivity.this, "Added post", Toast.LENGTH_SHORT).show();
                    AddPostActivity.this.finish();
                }
            });
        }
        @Override
        public void onFailure(@Nonnull final ApolloException e) {
            runOnUiThread(new Runnable() {
                @Override
                public void run() {
                    Log.e("", "Failed to perform AddPostMutation", e);
                    Toast.makeText(AddPostActivity.this, "Failed to add post", Toast.LENGTH_SHORT).show();
                    AddPostActivity.this.finish();
                }
            });
        }
    };
}
Note on Transfer Utility and AWS Cognito
If you expect your app to perform transfers that take longer than 50 minutes, use AmazonS3Client instead of TransferUtility.
Additional Resources
- Amazon Simple Storage Service Getting Started Guide
- Amazon Simple Storage Service API Reference
- Amazon Simple Storage Service Developer Guide
- Identity and Access Management Console
- Granting Access to an Amazon S3 Bucket
- Protecting data using customer provided encryption keys
Next Steps
For a sample app that demonstrates the TransferUtility capabilities, see S3 TransferUtility Sample.